
Kleber has a number of matching methods that can create unique match keys for your data to help identify duplicates quickly and easily.
Kleber creates matching keys in 3 varieties – Tight, Standard and Loose. Which one you choose to use will depend upon the situation and business need for finding the matches in the first place.
- Tight keys allow for little difference between matches. Tight keys are useful for matching where no user interaction is available.
- Loose keys will identify a lot more matches, some of which may be questionable, but will assist in identifying the last few percent of matches that are difficult to find. Loose Keys should never be used without user interaction to verify matches.
- Standard keys are a good balance between Tight and Loose key and depending on the outcome required may be used without user interaction.

EXPERT TIP: When trying to work out which match key/s to use from the many available – it’s best to initially test the keys on large quantities of data with someone verifying the results.
That way you can see which key or combination of keys best suits your business requirements.
What match keys are available in Kleber?
The 5 match methods create the following match keys:
1. DataTools.Match.Address.Au.CreateKeys
- Standard Address Key
- Tight Address Key
- Loose Address Key
- Address Locality
2. DataTools.Match.BusinessName.CreateKeys
- Standard Business Name Key
- Tight Business Name Key
- Loose Business Name Key
3. DataTools.Match.PersonName.CreateKeys
- Standard Person Name Key
- Tight Person Name Key
- Loose Person Name Key
4. DataTools.Match.BusinessNameAndAddress.Au.CreateKeys
- Standard Business Name and Standard Address Key
- Tight Business Name and Standard Address Key
- Loose Business Name and Tight Address Key
- Standard Business Name Key
- Tight Business Name Key
- Loose Business Name Key
- Standard Address Key
- Tight Address Key
- Loose Address Key
5. DataTools.Match.PersonNameAndAddress.Au.CreateKeys
- Standard Person Name and Standard Address Key
- Tight Person Name and Standard Address Key
- Tight Person Name and Loose Address Key
- Standard Person Name Key
- Tight Person Name Key
- Loose Person Name Key
- Standard Address Key
- Tight Address Key
- Loose Address Key
Detailed Explanations of the Match Keys
Standard Person and Standard Address matches
The base method used for detecting duplicated people. It allows for missing or differences in the unit or level numbers, and a balanced level of phonetic miss-spellings in the last name, street name or building name. In the example below the first name matches on initials only ie: “Alexandra”, “Alex” and “A” will all match as shown, as would “Anne” and “Albert”.
Tight Person and Standard Address matches
Keeps the same address rules as the Person and Address Method, but restricts the differences allowable in the first and last names to gain a match.
This is very useful when used along side the Person and Address Method because it will save you manually perusing these more certain results, allowing you to bring up only the more subjective results for review if desired.
In the example shown above only the first two records would match on Tight Person and Address. In the example below the first two records would be matched but the third record would require the standard Person and Address Method.
Tight Person and Loose Address matches
This finds matches where the first and last name match as in the Tight Person and Address Method, however it loosens up the address matching criteria to detect duplicates where records have missing or differing street numbers, and allows for phonetic matching on street and building names. This is a great way of netting extra tricky duplicates and is also used against other methods so that you only have to review the subjective results if desired.
For a complete sample file, scroll to the bottom of the guide
- Once you have completed setting up your survey choose which question blocks you need to add validation too.
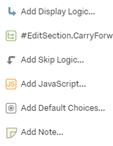
- Click on the ‘gear’ icon on the left side of your question block:

- You will then see several options but the one we want is ‘Add JavaScript…’ as shown below:
- When the JavaScript screen pops up click on the option “Full Screen” in the bottom left corner to make it easier.
- The screen should be pre-populated with the following:
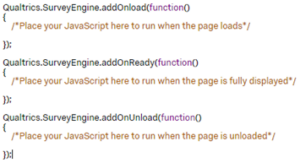
- We will be placing our code in the ‘addOnReady’ function, starting with the following section of code:
This section of code will allow us to use a different version of jQuery and jQueryUi, which allows the autocomplete/ajax code to work on the survey, as well as:
- It will set the variable for your Kleber RequestKey
- A label that will display to the client if the response was valid or invalid
- Next, we will add the code that calls the Kleber platform to validate the address field:
- Whilst not shown we can also set ‘minLength’ option of the autocomplete so that the search will only fire after a set number of characters
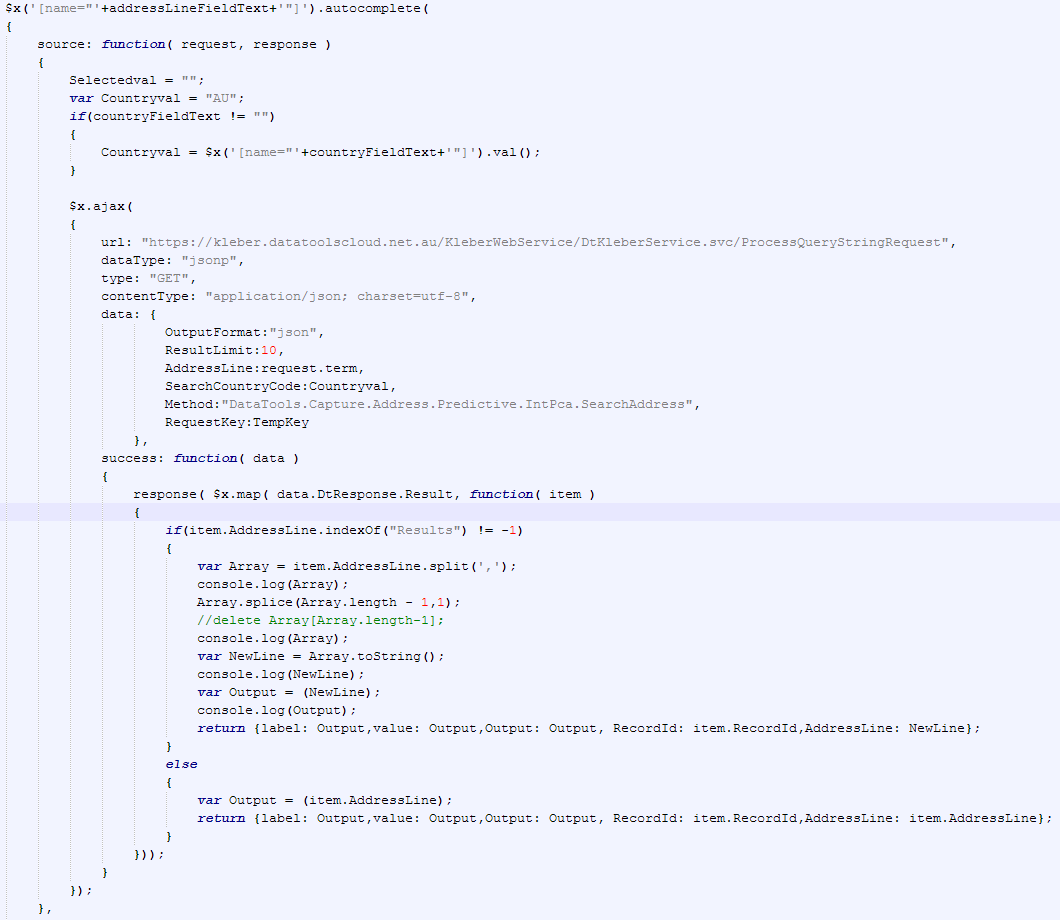
- This code will pass values entered into the address field, to Kleber platform, where it will process and return possible addresses
- We temporarily remove the ‘# results’ from the end of some strings as they are not needed, then pass the new string as a possible suggestion
- This next section will be how we handle the retrieve method when a customer selects an address, as well as what to do if the user doesnt select an address at all.
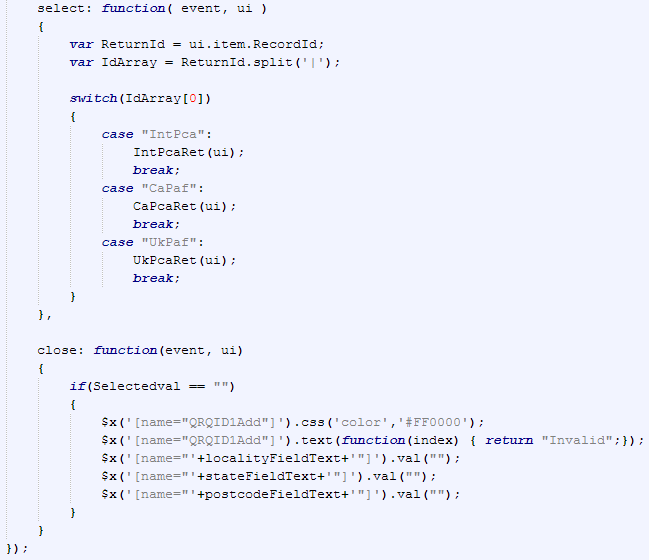
- When a user selects an address we set an id variable and save the id as an array
- We then check the first index of the array variable to determine which retireve method we should call next
- With the international search, addresses from either the UK or Canada have a seperate retrieve price so we need to use those specific retrieves
- When the user closes the search window without selecting an address, we set the other fields to empty and set a label to “Invalid”
- This section is for the function that will handle the Retrieve method for countries other then the UK or Canada.
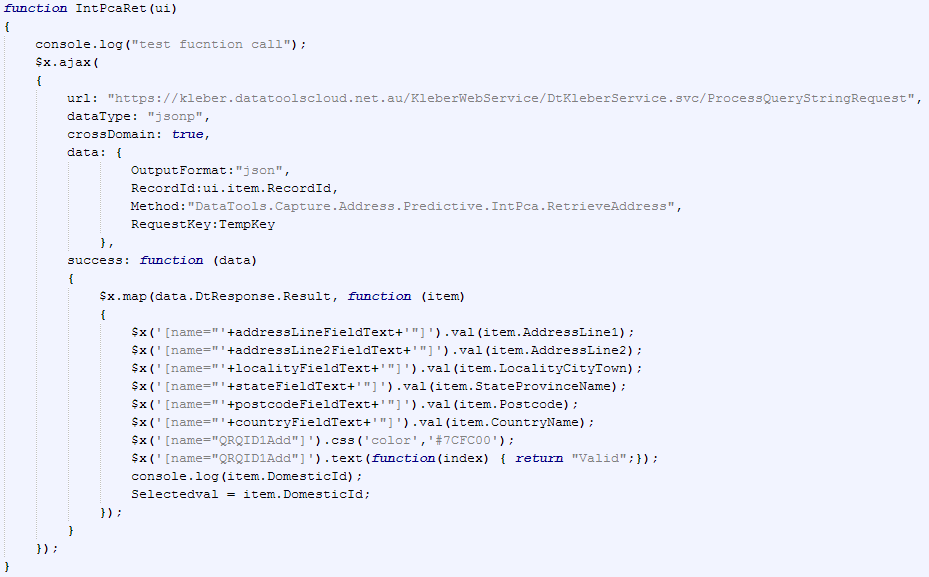
- Here we will populate the data with the recordId from the search method
- In the response we will populate our fields with the returned address data
- We have left the debug to console just to verify that the function works
- This section we will be dealing with the function responsible for results when search a Canadian address
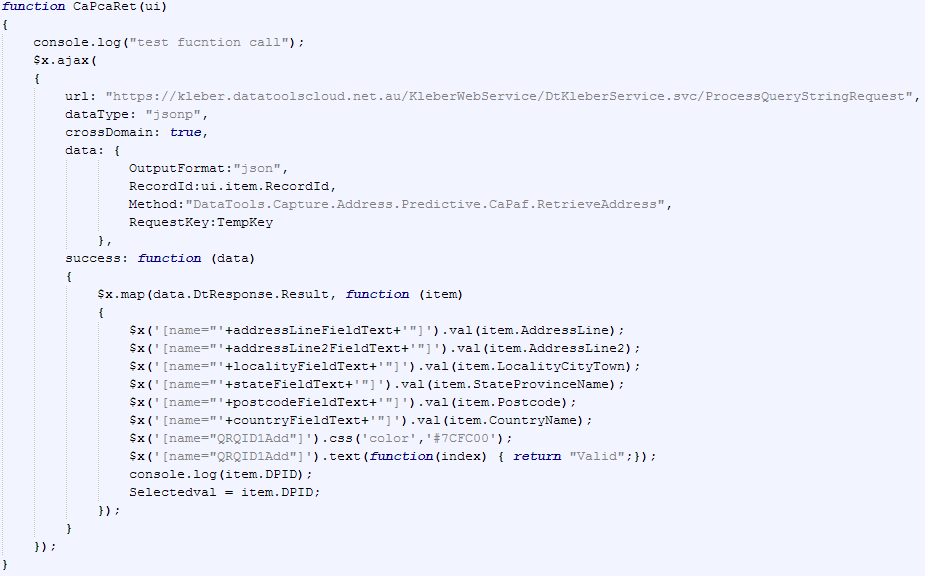
- Here we will populate the data with the recordId from the search method and will also use a different retrieve method
- In the response we will populate our fields with the returned address data
- We have left the debug to console just to verify that the function works
- This section we will be dealing with the function responsible for results when search an UK address
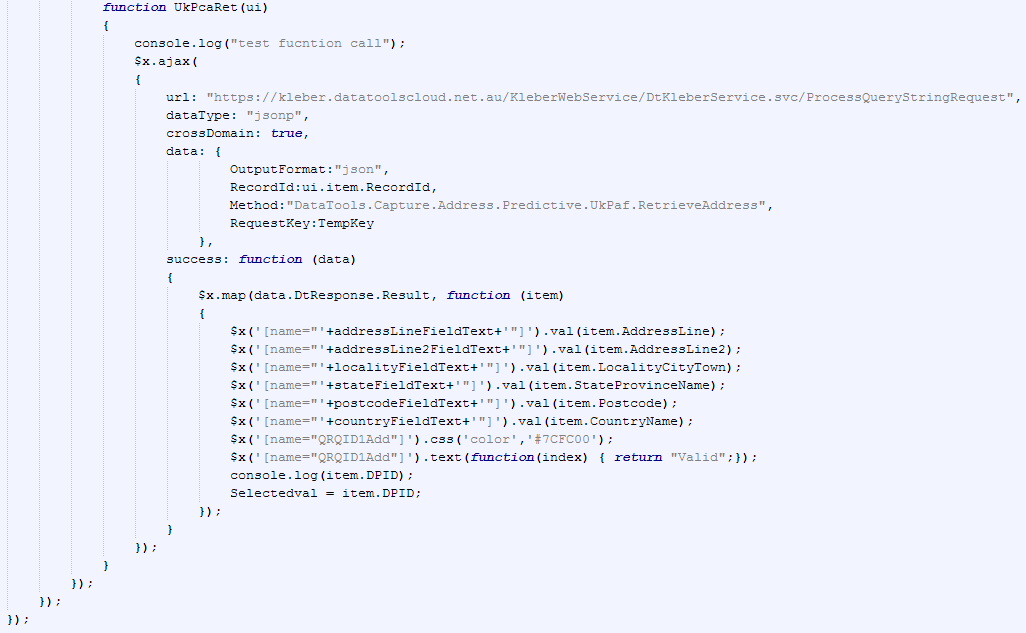
- Here we will populate the data with the recordId from the search method and will also use a different retrieve method
- In the response we will populate our fields with the returned address data
- We have left the debug to console just to verify that the function works
Congratulations! You have just integrated Kleber Email Validation into your Qualtrics survey. Please look at some of the other step-by-step guides if you wish to add additional validation.
Complete Sample code
For a complete sample file, scroll to the bottom of the guide.
- Once you have completed setting up your survey choose which question blocks you need to add validation too.
- Click on the ‘gear’ icon on the left side of your question block:
- You will then see several options but the one we want is ‘Add JavaScript…’ as shown below:
- When the JavaScript screen pops up click on the option “Full Screen” in the bottom left corner to make it easier.
- The screen should be pre-populated with the following:
- We will be placing our code in the ‘addOnReady’ function, starting with the following section of code:
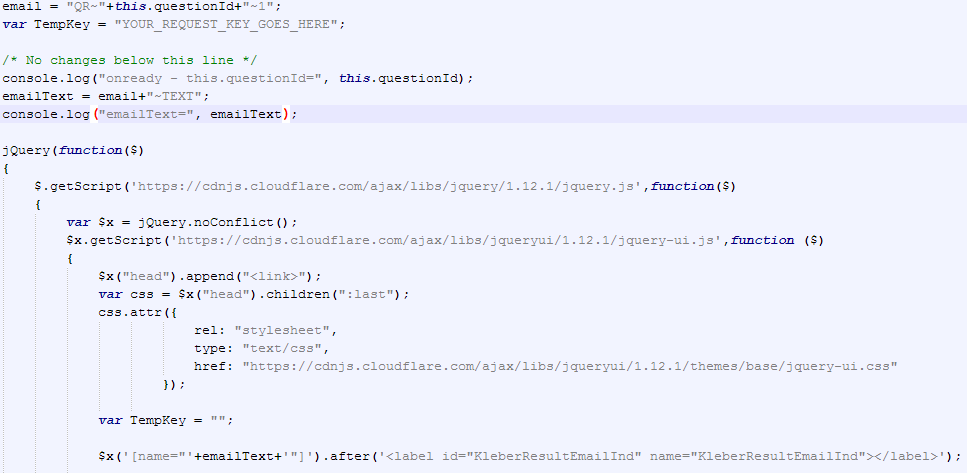
This section of code will allow us to use a different version of jQuery and jQueryUi, which allows the autocomplete/ajax code to work on the survey, as well as:- It will set the variable for your Kleber RequestKey
- A label that will display to the client if the response was valid or invalid
- Next, we will add the code that calls the Kleber platform to validate the email field:
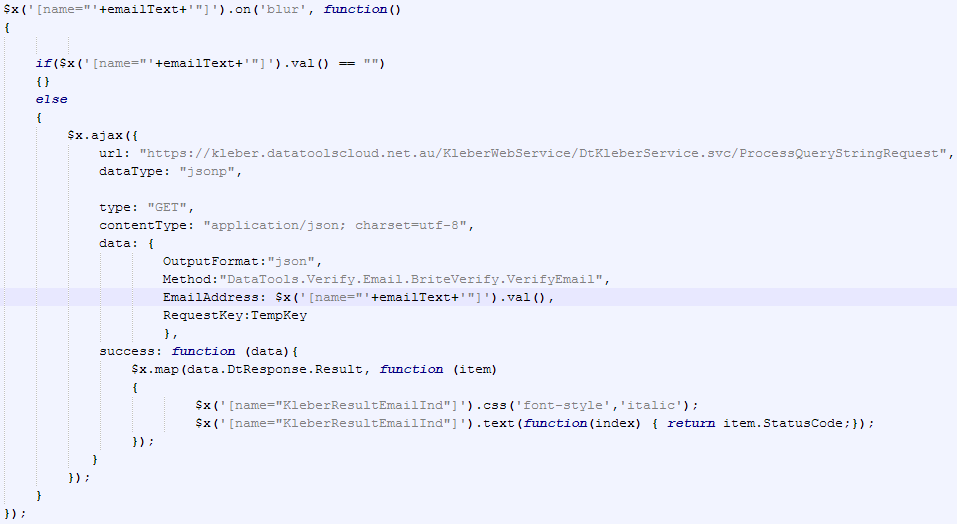
- Here we make it so that when the email field loses focus, it will attempt to validate the email
- If the call is successful we output the StatusCode for this sample but other fields are available
- If we had business rules to apply for when an email is valid/invalid we would call them here
Congratulations you have just integrated Kleber Email Validation into your Qualtrics survey.
Please look at some of the other step-by-step guides if you wish to add additional validation.
Complete Sample code
For a complete sample file, scroll to the bottom of the guide
- Once you have completed setting up your survey choose which question blocks you need to add validation too.
- Click on the ‘gear’ icon on the left side of your question block:
- You will then see several options but the one we want is ‘Add JavaScript…’ as shown below:
- When the JavaScript screen pops up click on the option “Full Screen” in the bottom left corner to make it easier.
- The screen should be pre-populated with the following:
- We will be placing our code in the ‘addOnReady’ function, starting with the following section of code:
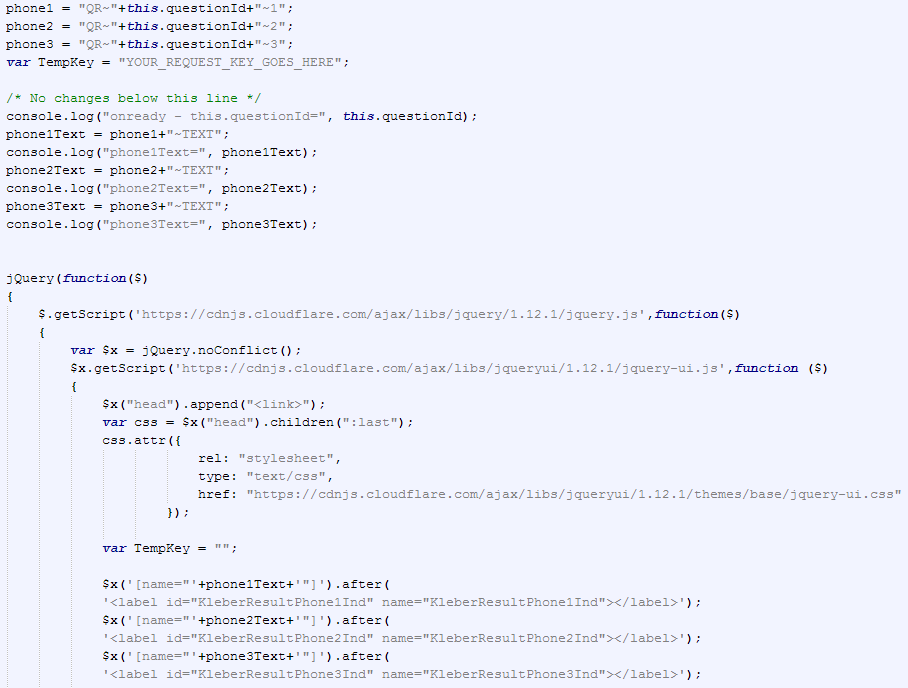
This section of code will allow us to use a different version of jQuery and jQueryUi, which allows the autocomplete/ajax code to work on the survey, as well as:
- Create the variables needed for the phone methods
- It will set the variable for your Kleber RequestKey
- A label that will display to the client if the response was valid or invalid
- Next, we will add the code that calls the Kleber platform to validate the first phone number field:
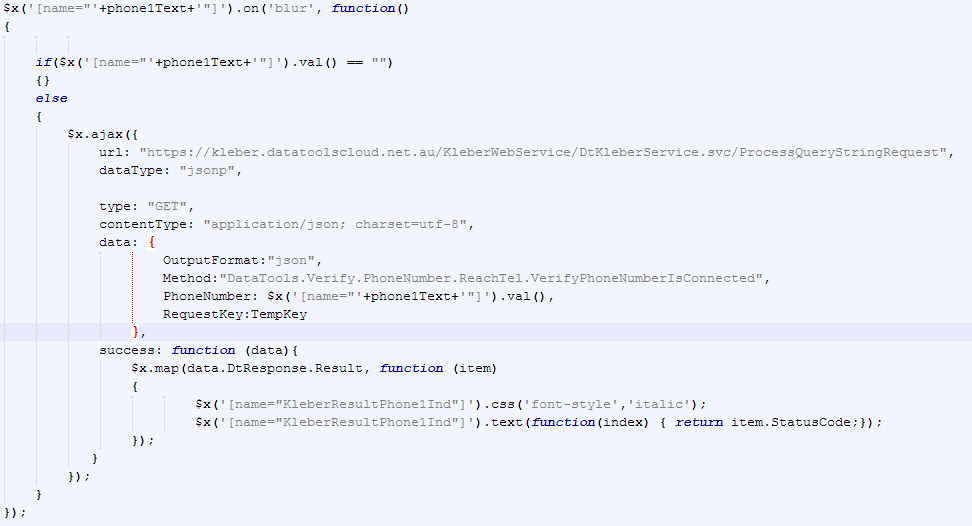
- Here we make it so that when the phone number field loses focus, it will attempt to validate the phone number
- If the call is sucessful we output the StatusCode for this sample but other fields are avilable
- If we had bsuiness rules to apply for when a phone number is valid/invalid we would call them here
- We then repeat the previous step another 2 times for the other 2 phone fields and make sure that all functions have their closing brackets in the correct spot
Congratulations you have just integrated Kleber Phone Validation into your Qualtrics survey.
Please look at some of the other step-by-step guides if you wish to add additional validation.
Complete Sample code
For a complete sample file, scroll to the bottom of the guide
- Once you have completed setting up your survey choose which question blocks you need to add validation too.
- Click on the ‘gear’ icon on the left side of your question block:
- You will then see several options but the one we want is ‘Add JavaScript…’ as shown below:
- When the JavaScript screen pops up click on the option “Full Screen” in the bottom left corner to make it easier.
- The screen should be pre-populated with the following:
- We will be placing our code in the ‘addOnReady’ function, starting with the following section of code:
This section of code will allow us to use a different version of jQuery and jQueryUi, which allows the autocomplete/ajax code to work on the survey, as well as:
- It will set the variable for your Kleber RequestKey
- A variable used later to indicate that a select/result was returned
- A label that will display to the client if the response was valid or invalid
- Once you know which type of validation you wish to use, the code will go where you can see ‘METHOD_CODE_GOES_HERE’ as the code shown so far is used for just about every method
- Next, we will start with the autocomplete and search/source function which should replace the “METHOD_CODE_GOES_HERE”:
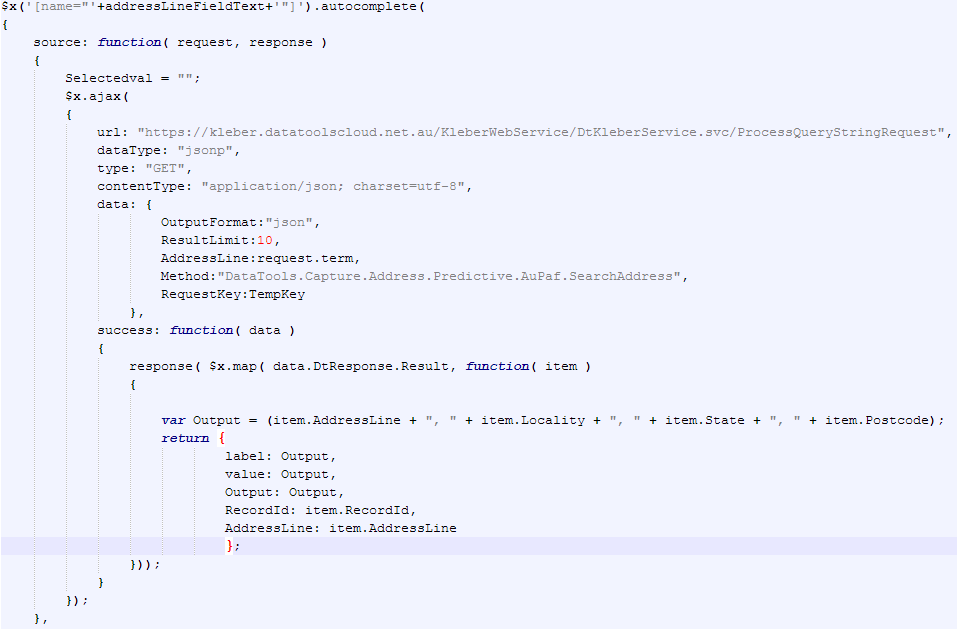
At the top of the screenshot you will notice you need to use the variable you created earlier for the address line field. Once you have that sorted you shouldn’t need to change anything here
- This next section will handle what to do when the customer either selects an address from the list or closes the dropdown due to the address not existing in the data source:
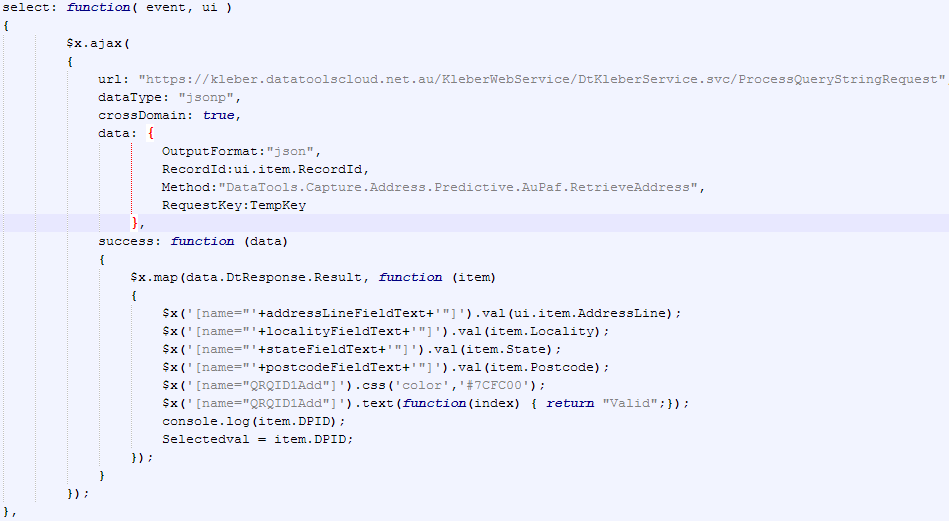
- Here we make it so that when a client selects the address they wish to use, we have to send another call off to the Kleber server to retrieve the address components (also mandatory)
- We may need to make changes to some of the code such as field mapping
- We can also change the text displayed that indicates if the address is valid or not, or use an image
- There are plenty more result fields we can use with the retrieve method but for this trial we will only use the Locality, State, Postcode and the DPID fields.
- The last section of code is where we decide what to do when the search dropdown disappears without any addresses being selected. This section may not be relevant to all the methods available on the Kleber platform, but we will add it for this example:
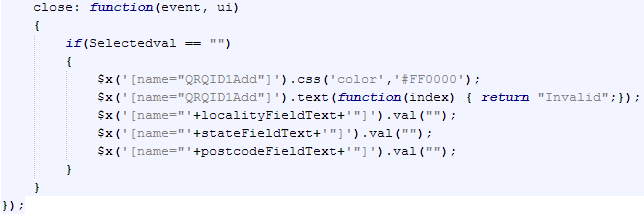
- Here we set the fields, other then the address line, to blank.
- If the user doesn’t select a valid address, then they will still be able to fill-in the address line and the other fields manually.
- We advise against locking the form down when a validation is false/incorrect.
- As you can see we also set the result text to ‘Invalid’ with a color setting so that it can stand-out.
Congratulations you have just integrated Kleber into your Qualtrics survey.
Please look at some of the other step-by-step guides if you wish to add additional validation.
Complete Sample code
Qualtrics.SurveyEngine.addOnload(function()
{
/*Place your JavaScript here to run when the page loads*/
console.log("onload");
});
Qualtrics.SurveyEngine.addOnReady(function()
{
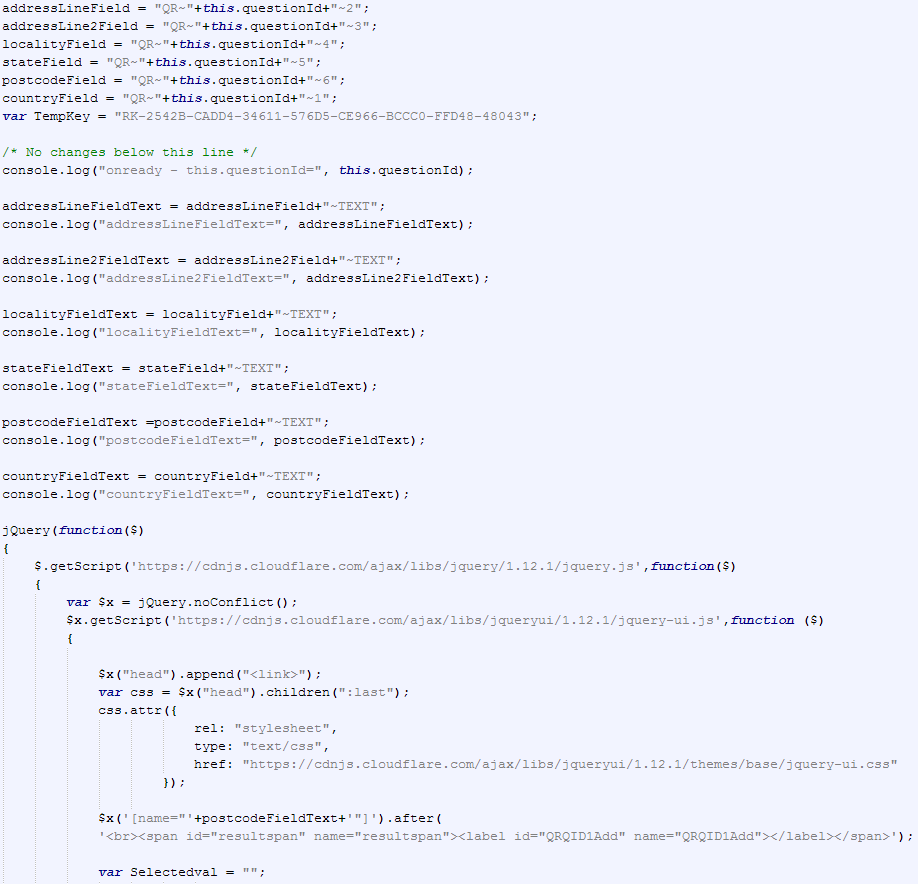
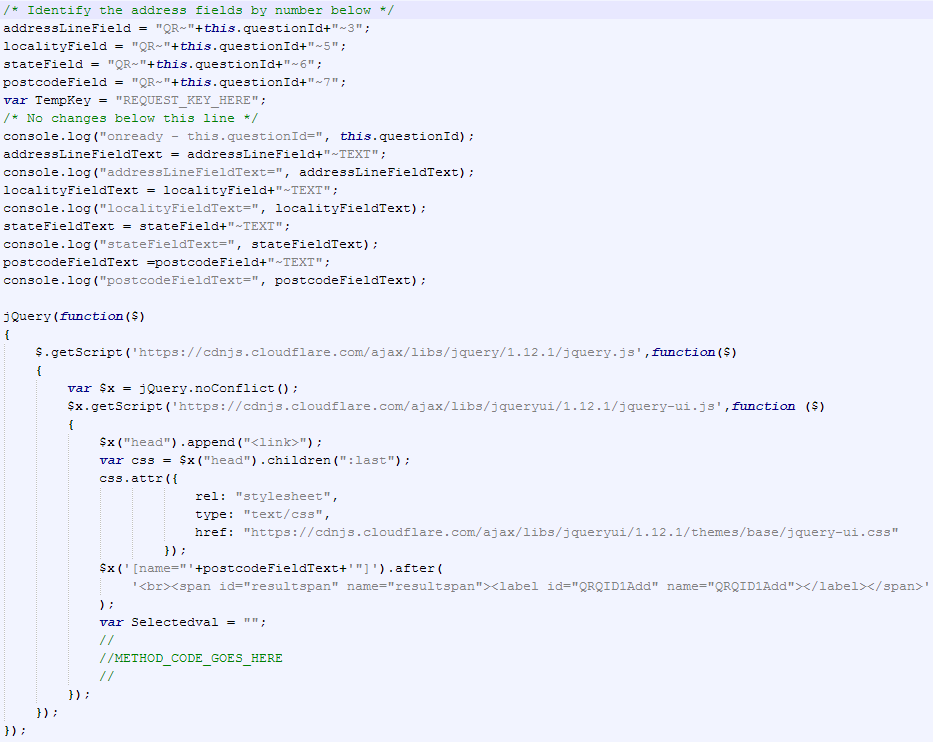
/* Identify the address fields by number below */
addressLineField = "QR~"+this.questionId+"~3";
localityField = "QR~"+this.questionId+"~5";
stateField = "QR~"+this.questionId+"~6";
postcodeField = "QR~"+this.questionId+"~7";
var TempKey = "YOUR_REQUEST_KEY_GOES_HERE";
/* No changes below this line */
console.log("onready - this.questionId=", this.questionId);
addressLineFieldText = addressLineField+"~TEXT";
console.log("addressLineFieldText=", addressLineFieldText);
localityFieldText = localityField+"~TEXT";
console.log("localityFieldText=", localityFieldText);
stateFieldText = stateField+"~TEXT";
console.log("stateFieldText=", stateFieldText);
postcodeFieldText =postcodeField+"~TEXT";
console.log("postcodeFieldText=", postcodeFieldText);
jQuery(function($){
$.getScript('https://cdnjs.cloudflare.com/ajax/libs/jquery/1.12.1/jquery.js',function($){
var $x = jQuery.noConflict();
$x.getScript('https://cdnjs.cloudflare.com/ajax/libs/jqueryui/1.12.1/jquery-ui.js',function ($){
$x("head").append("<link>");
var css = $x("head").children(":last");
css.attr({ rel: "stylesheet",type: "text/css", href: "https://cdnjs.cloudflare.com/ajax/libs/jqueryui/1.12.1/themes/base/jquery-ui.css"});
$x('[name="'+postcodeFieldText+'"]').after('<br><span id="resultspan" name="resultspan"><label id="QRQID1Add" name="QRQID1Add"></label></span>');
var Selectedval = "";
$x('[name="'+addressLineFieldText+'"]').autocomplete(
{
source: function( request, response )
{
Selectedval = "";
$x.ajax(
{
url: "https://kleber.datatoolscloud.net.au/KleberWebService/DtKleberService.svc/ProcessQueryStringRequest",
dataType: "jsonp",
type: "GET",
contentType: "application/json; charset=utf-8",
data: {OutputFormat:"json", ResultLimit:10, AddressLine:request.term, Method:"DataTools.Capture.Address.Predictive.AuPaf.SearchAddress", RequestKey:TempKey},
success: function( data )
{
response( $x.map( data.DtResponse.Result, function( item )
{
var Output = (item.AddressLine + ", " + item.Locality + ", " + item.State + ", " + item.Postcode);
return {label: Output,value: Output,Output: Output, RecordId: item.RecordId,AddressLine: item.AddressLine};
}));
}
});
},
select: function( event, ui )
{
$x.ajax(
{
url: "https://kleber.datatoolscloud.net.au/KleberWebService/DtKleberService.svc/ProcessQueryStringRequest",
dataType: "jsonp",
crossDomain: true,
data: {OutputFormat:"json", RecordId:ui.item.RecordId, Method:"DataTools.Capture.Address.Predictive.AuPaf.RetrieveAddress", RequestKey:TempKey},
success: function (data)
{
$x.map(data.DtResponse.Result, function (item)
{
$x('[name="'+addressLineFieldText+'"]').val(ui.item.AddressLine);
$x('[name="'+localityFieldText+'"]').val(item.Locality);
$x('[name="'+stateFieldText+'"]').val(item.State);
$x('[name="'+postcodeFieldText+'"]').val(item.Postcode);
$x('[name="QRQID1Add"]').css('color','#7CFC00');
$x('[name="QRQID1Add"]').text(function(index) { return "Valid";});
console.log(item.DPID);
Selectedval = item.DPID;
});
}
});
},
close: function(event, ui)
{
if(Selectedval == "")
{
$x('[name="QRQID1Add"]').css('color','#FF0000');
$x('[name="QRQID1Add"]').text(function(index) { return "Invalid";});
$x('[name="'+localityFieldText+'"]').val("");
$x('[name="'+stateFieldText+'"]').val("");
$x('[name="'+postcodeFieldText+'"]').val("");
}
}
});
});
});
});
});
Qualtrics.SurveyEngine.addOnUnload(function()
{
/*Place your JavaScript here to run when the page is unloaded*/
});
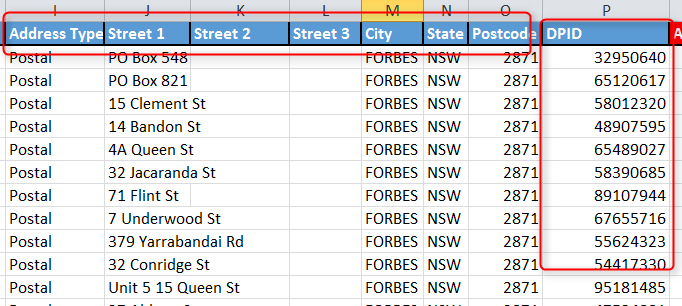
This article was created by Sujoy Majumdar from St Vincent De Paul Society NSW – he explains how he used Kleber Batch to add DPID into their Excel datasheets.
 Output: We have the DPID entered for the above bunch of addresses –Shown in the screenshot below.It was possible using the tool : http://kleber.datatools.com.au/
To achieve this we have to send to Kleber a batch of addresses (Due to Excel not being able to do multi threading we are limited to sending up to 50 at a time)
- The code below first open the Source Excel sheet
- Counts how many are there. Breaks them into batches of 20(in this case)
- Reads 20 each and sends 20 to kleber to verify the address and fetch the DPID
- the results from kleber is concatenated into a single string
- Once all the addresses have been verified the application opens the destination excel sheet and writes the result to it.
using System;
using System.Data;
using System.Linq;
using System.Text;
using System.Xml;
using System.IO;
using System.Windows.Forms;
using System.ComponentModel;
using LinqToExcel;
using LinqToExcel.Attributes;
using TextExcel.KleberServicePostCode;
using Excel=Microsoft.Office.Interop.Excel;
namespace TextExcel
{
//public sealed class OpenFileDialog : FileDialog
public partial class Form1 : Form
{
public Form1()
{
InitializeComponent();
}
public static string destinationFile;// = txt_SourceFileLocation.Text.ToString();// @"C:\Kleber\AcquisitionFileUpload.xlsx";
public static string sourceFile;
//public static BindingList<Address> AddressList = new BindingList<Address>();
private static Excel.Workbook MyBook = null;
private static Excel.Application MyApp = null;
private static Excel.Worksheet MySheet = null;
private static int lastRow = 0;
public string msg_Success = "Job completed succesfully";
public string msg_Failure = "Job couldnt be completed . Encountered errors";
public string msg_InProgress = "Job in progress";
public static ExcelQueryFactory excel;
int counter = 1;
string DtResponseXml = null;
string FinalDtResponseXml = null;
string DtRequestXml = null;
public static void InitializeExcel()
{
try
{
//open the source file
excel = new ExcelQueryFactory(sourceFile)
{
DatabaseEngine = LinqToExcel.Domain.DatabaseEngine.Ace,
TrimSpaces = LinqToExcel.Query.TrimSpacesType.Both,
UsePersistentConnection = true,
ReadOnly = true
};
/// open the destination file
MyApp = new Excel.Application();
MyApp.Visible = false;
MyBook = MyApp.Workbooks.Open(destinationFile);
MySheet = (Excel.Worksheet)MyBook.Sheets[1]; // Explict cast is not required here
lastRow = MySheet.Cells.SpecialCells(Excel.XlCellType.xlCellTypeLastCell).Row;
}
catch (Exception ex)
{
MyBook.Close();
//MySheet.Unprotect();
MyApp.Quit();
}
}
public void useKleber( int lLimit,int uLimit)// This is the metod used for calling the kleber web service
{
var address = from p in excel.Worksheet<Address>(0) select p;
XmlWriterSettings XmlWriterSettings = new XmlWriterSettings();
XmlWriterSettings.Indent = true;
XmlWriterSettings.OmitXmlDeclaration = true;
StringBuilder XmlStringBuilder = new StringBuilder();
XmlWriter XmlWriter = XmlWriter.Create(XmlStringBuilder, XmlWriterSettings);
XmlWriter.WriteStartElement("DtRequests");
for (int i = lLimit; i <= uLimit; i++)
{
var add = new Address();
add = address.First(h => h.RequestId == i);
// Create DtRequest Query XML
XmlWriter.WriteStartElement("DtRequest");
XmlWriter.WriteAttributeString("Method", "DataTools.Verify.Address.AuPaf.VerifyAddress");
XmlWriter.WriteAttributeString("AddressLine1", add.Street1);
XmlWriter.WriteAttributeString("AddressLine2", add.Street2);
XmlWriter.WriteAttributeString("AddressLine3", add.Street3);
XmlWriter.WriteAttributeString("AddressLine4", "");
XmlWriter.WriteAttributeString("AddressLine5", "");
XmlWriter.WriteAttributeString("AddressLine6", "");
XmlWriter.WriteAttributeString("Locality", add.City);
XmlWriter.WriteAttributeString("State", add.State);
XmlWriter.WriteAttributeString("Postcode", add.Postcode);
XmlWriter.WriteAttributeString("RequestId", add.RequestId.ToString());
XmlWriter.WriteAttributeString("RequestKey", "RK-*****-*****-*****-*****-*****-*****"); // Insert your Request Key
XmlWriter.WriteAttributeString("DepartmentCode", "");
XmlWriter.WriteEndElement();
}
XmlWriter.WriteEndElement();
XmlWriter.Close();
DtRequestXml = XmlStringBuilder.ToString();
XmlWriter.Dispose();
//---------------------------------------------------------------------------------------------
//Send DtRequest to Kleber Server for processing
DtKleberServiceClient KleberServer = new DtKleberServiceClient("BasicHttpBinding_IDtKleberService");
DtResponseXml = KleberServer.ProcessXmlRequest(DtRequestXml);
FinalDtResponseXml = FinalDtResponseXml + DtResponseXml;
}
private void button1_Click(object sender, EventArgs e)
{
//useKleber(1, 200);
lbl_Result.Text = msg_InProgress;
var excel = new ExcelQueryFactory(sourceFile)
{
DatabaseEngine = LinqToExcel.Domain.DatabaseEngine.Ace,
TrimSpaces = LinqToExcel.Query.TrimSpacesType.Both,
UsePersistentConnection = true,
ReadOnly = true
};
var address = from p in excel.Worksheet<Address>(0) select p;
int combi = 0;
int lowerLimit = 1;
int CountOfRecords = address.Count();//get count of records in excell sheet
//the records require to be divide by 50 - as Kleber can process only 50 records at a time.
int remainder = CountOfRecords % 20;
int quotient = CountOfRecords / 20;
try
{
InitializeExcel();
}
catch (Exception ex)
{
lbl_Result.Text = msg_Failure;
}
if (quotient > 0) //the quotitent is more than 1 -meaning the number of cycles loop
{
for (int j = 1; j <= quotient; j++)
{
useKleber(counter, (counter + 19));
counter = counter + 20;
}
if (remainder > 0)
{
useKleber(((quotient * 20) + 1), ((quotient * 20) + remainder));
}
}
else
{
useKleber(1, remainder);
}
FinalDtResponseXml = "<EmbeddedByVinnies>" + FinalDtResponseXml + "</EmbeddedByVinnies>";
StringBuilder XmlResponseStringBuilder = new StringBuilder();
int ResultCounter = 0;
string responseFetchedReqId = null;
string responseFetchedValue = null;
string resultFetchedName = null;
string resultFetchedValue = null;
int position = 1;
XmlReader XmlReader = XmlReader.Create(new StringReader(FinalDtResponseXml));
try
{
while (XmlReader.Read())
{
lastRow += 1;
if (XmlReader.IsStartElement())
{
switch (XmlReader.Name)
{
case "DtResponse":
//Console.WriteLine("DT RESPONSE");
if (XmlReader.HasAttributes)
{
position = 1;
while (XmlReader.MoveToNextAttribute())
{
switch (XmlReader.Name)
{
case "RequestId":
responseFetchedReqId = XmlReader.Value;
break;
}
}
XmlReader.MoveToElement();
}
//Console.WriteLine(DisplayDoubleDividerString);
break;
case "Result":
//Console.WriteLine("RESULT " + ResultCounter);
position = Convert.ToInt32(responseFetchedReqId); position++;
if (XmlReader.HasAttributes)
{
//position = 1 ;
while (XmlReader.MoveToNextAttribute())
{
switch (XmlReader.Name)
{
case "AddressLine":
resultFetchedName = XmlReader.Name;
resultFetchedValue = XmlReader.Value;
MySheet.Cells[position, 10] = resultFetchedValue;
break;
case "City":
resultFetchedName = XmlReader.Name;
resultFetchedValue = XmlReader.Value;
MySheet.Cells[position, 13] = resultFetchedValue;
break;
case "Postcode":
resultFetchedName = XmlReader.Name;
resultFetchedValue = XmlReader.Value;
MySheet.Cells[position, 15] = resultFetchedValue;
break;
case "State":
resultFetchedName = XmlReader.Name;
resultFetchedValue = XmlReader.Value;
MySheet.Cells[position, 14] = resultFetchedValue;
break;
case "DPID":
resultFetchedName = XmlReader.Name;
resultFetchedValue = XmlReader.Value;
MySheet.Cells[position, 16] = resultFetchedValue;
ResultCounter++;
break;
}
}
XmlReader.MoveToElement();
}
//Console.WriteLine(DisplayDividerString);
break;
}
}
MyBook.Save();
ResultCounter++;
}
MyBook.Save();
string XMLReaderDump = XmlReader.ToString();
XmlReader.Dispose();
MyBook.Saved = true;
MyBook.Close();
//MySheet.Unprotect();
MyApp.Quit();
lbl_Result.Text = msg_Success;//"Job completed succesfully";
}
catch (Exception ex)
{
XmlReader.Dispose();
//MyBook.Saved = true;
MyBook.Close();
//MySheet.Unprotect();
MyApp.Quit();
lbl_Result.Text = msg_Failure;// "Job couldnt be completed . Encountered errors";
}
}
private void Form1_Load(object sender, EventArgs e)
{
}
private void button3_Click(object sender, EventArgs e)
{
}
private void btn_BrowseDestinationFile_Click(object sender, EventArgs e)
{
OpenFileDialog openFileDialog1 = new OpenFileDialog();
int size = -1;
DialogResult result = openFileDialog1.ShowDialog(); // Show the dialog.
if (result == DialogResult.OK) // Test result.
{
string file = openFileDialog1.FileName;
txt_DestinationFileLocation.Text = file;
destinationFile = file;
try
{
string text = File.ReadAllText(file);
size = text.Length;
}
catch (IOException)
{
lbl_Result.Text = msg_Failure;
}
}
}
private void btn_BrowseSourceFile_Click(object sender, EventArgs e)
{
OpenFileDialog openFileDialog1 = new OpenFileDialog();
int size = -1;
DialogResult result = openFileDialog1.ShowDialog(); // Show the dialog.
if (result == DialogResult.OK) // Test result.
{
string file = openFileDialog1.FileName;
txt_SourceFileLocation.Text = file;
sourceFile = file;
try
{
string text = File.ReadAllText(file);
size = text.Length;
}
catch (IOException)
{
lbl_Result.Text = msg_Failure;
}
}
}
private void label1_Click(object sender, EventArgs e)
{
}
private void label1_Click_1(object sender, EventArgs e)
{
}
private void label2_Click(object sender, EventArgs e)
{
}
private void tableLayoutPanel1_Paint(object sender, PaintEventArgs e)
{
}
}
internal class Address
{
[ExcelColumn("Street 1")]
public string Street1 { get; set; }
[ExcelColumn("Street 2")]
public string Street2 { get; set; }
[ExcelColumn("Street 3")]
public string Street3 { get; set; }
[ExcelColumn("City")]
public string City { get; set; }
[ExcelColumn("State")]
public string State { get; set; }
[ExcelColumn("Postcode")]
public string Postcode { get; set; }
[ExcelColumn("RequestId")]
public int RequestId { get; set; }
}
}
Clients who use the DataTools.Capture.Address.Predictive.IntPca.SearchAddress method sometimes find that there can be a time lag when displaying results.
This usually occurs when there are multiple results for an address (such as in a large apartment or office building) and the method is trying to display them all.
So we added an option to the IntPca.SearchAddress method that can group addresses for a building together which speeds up the search and makes it easier for the user to select an address.
How to add Grouped return results
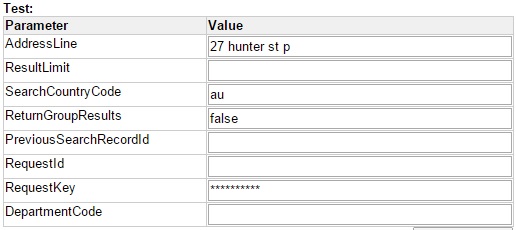
When you look at the Input Parameters for the DataTools.Capture.Address.Predictive.IntPca.SearchAddress method you will see the option of ReturnGroupResults.
Setting it to False
By default this parameter is set to False. That means if you leave the field blank or type in the word False (I.e ReturnGroupResults=False) the address search will NOT return any applicable results in groups and all addresses will be listed below.
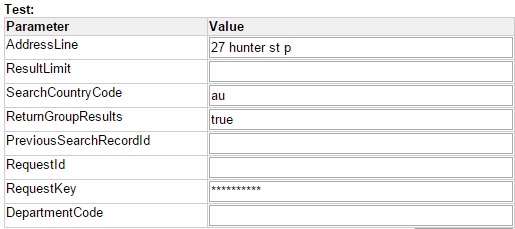
Setting it to True
If you set the parameter to True (I.e ReturnGroupResults=True) – it will group results for an address by showing the basic street address with “x Results” listed beside it. Groups can appear at locality, street name or building level depending how the information is entered.
The grouped records are identified with the return field “NextSearch=Search”.
This means to get the child records for the group result the RecordId for the group record needs to be resubmitted using the Search method. This would be done when the group record is selected from the list.
Address results are identified with the return field NextSearch=Retrieve meaning the next process required it to use the Retrieve method. (i.e. the DataTools.Capture.Address.Predictive.IntPca.RetrieveAddress method)
Example
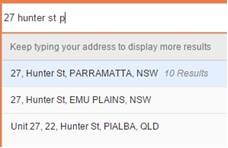
If we set the parameter to “ReturnGroupResults=True” and type in the partial address “27 Hunter St P”, you can see that for the 27 Hunter St Parramatta NSW address listed at the top there are 10 results available for that address.
To get started in Kleber you only need to complete 3 simple steps.
STEP 1. Register for Kleber
First you need to register your name and company details to open an account in Kleber.
To register you can either click here OR if you want to find out more about Kleber first – click on the the Learn More page. At the bottom of this page you can click on the “Click here to Register” button.
Note: When you register for Kleber you will receive $50 FREE CREDIT to trial any method you like!

Step 2. Get your Request Key and Server Paths
These are client specific and are required to make any Kleber method work.
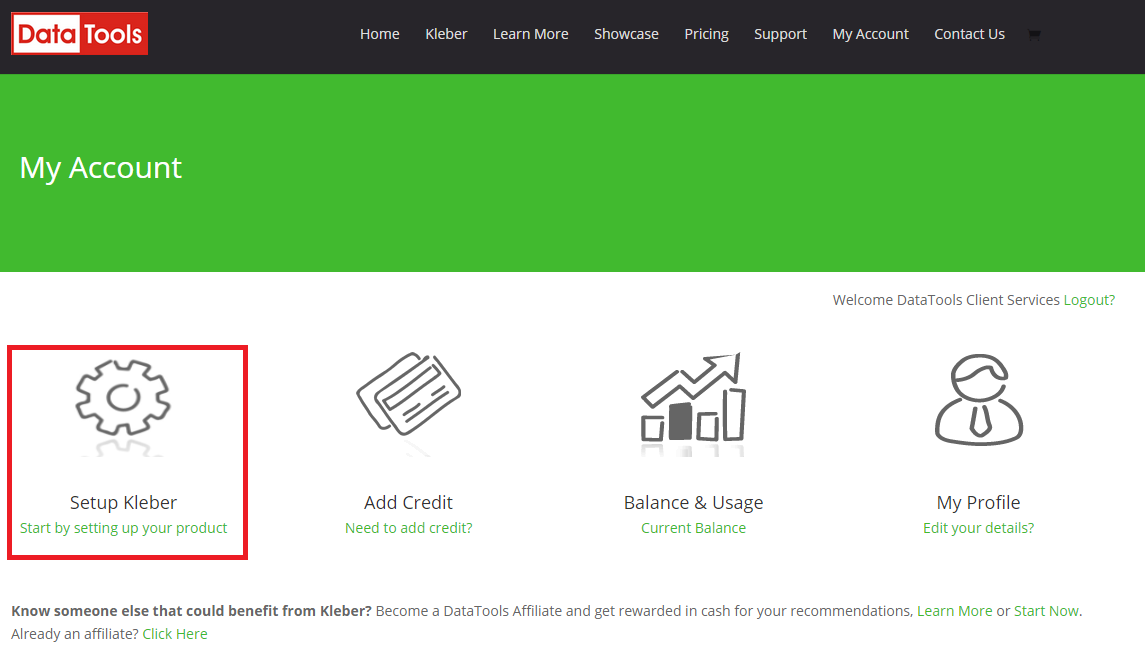
Once you have registered you will be taken to the My Account area. To access your Request Key and Server paths you need to click on the “Setup Kleber” button. (See the How to find your Kleber Request Key and Server paths page for more detailed information.)
Step 3. Find the method/s you need and start coding!
Once you have the above information all you need to do is go to the method or methods you want to use, test it out, and then use the sample codes to help you develop the method into your own system!
Need more help?
Should you need any further assistance with setting up Kleber you can always contact our Client Services team on (02) 9687 4666 or support@datatools.com.au. Or use the Support area for guides, forums, etc.
We provided unlimited support and technical advice to all clients regardless of whether you are trialling the product or are a long term subscriber.
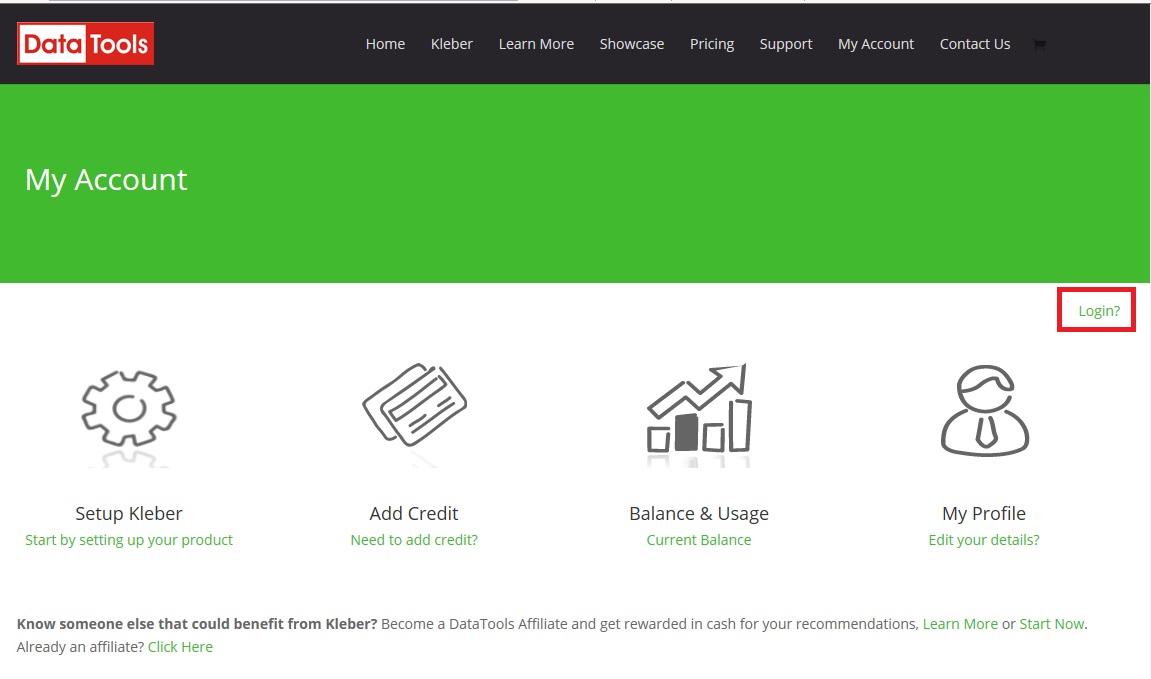
What else can I do in My Account?
Your My Account Area can help you with all sorts of things. The four main buttons are:
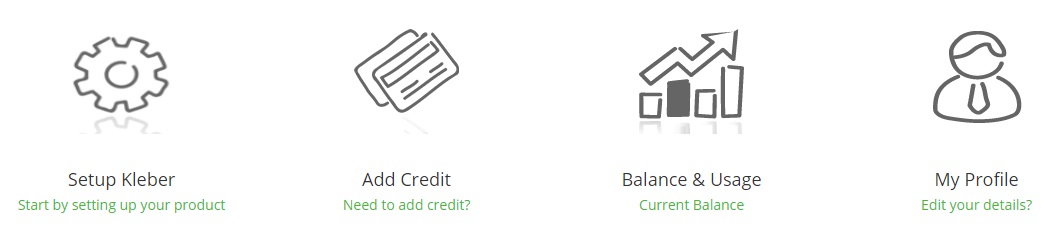
Setup Kleber – provides you with your Request Key and Server Paths to get you going in Kleber.
Add Credit – where you can sign up to a monthly subscriptions OR add a top up amount if your monthly usage is higher than normal.
Balance & Usage – where you can track & monitor your transaction usage and costs. We recommend watching these daily to begin with to ensure your subscription amount is right for you!
My Profile – where you can change your contact details if necessary.
The Notifications section is worth checking periodically as it will provide information on any scheduled server maintenance, upgrades to data etc.
You can even sign up as an affiliate and earn commission for recommending Kleber. To learn more go to Affiliate Program page.
Note: Please ensure you thoroughly test the use of any Kleber method & are happy with the results before going into production. DataTools is charged by the data suppliers for use of every method – therefore ALL calls to ANY Kleber method will incur a cost. When you register with Kleber, DataTools provides you with $50 free credit to help with development and trialling of the service. Once that credit is used you will need to purchase a monthly subscription and/or top up to continue using the service, even for development purposes. Please check the Method Pricing List for all current costs. DataTools does not warrant or guarantee the quality of the results returned and will not be held responsible for any costs incurred by using a method. Should you have any questions please contact your Sales representative or the Client Services team.
- Click on the My Account button in the Kleber website main bar at the top.
- Then click onto the My Profile icon. (If you are not logged in – in please enter your username and password.)

- Click Change Password button on the right.

- At Password Change – first enter your current password.
- Then enter and then confirm the NEW password.
- Then click Save Changes button.

IMPORTANT – these steps will only update the email used to login to the My Account area AND will be the email attached to any new subscription orders purchased moving forward.
If the contact email for your current subscription order also needs to be updated (so that the new contact receives the current monthly invoices) please contact Client Services on support@datatools.com.au with the new email so that they can update it within the Kleber invoicing system for you.
1. Log into My Account in Kleber using the current email login details. http://kleber.datatools.com.au/my_account/
2. Click on My Profile

3. Click on the Edit Details button

4. In the Email Address box – delete the old email and type in the new email. Press Save Changes button at the bottom. The email has now been updated.
Remember to email Client Services on ‘support@datatools.com.au’ if you need the current subscription order updated as well.

If you want to view all your subscription details – please do the following.
STEP 1 – Go to http://kleber.datatools.com.au/my_account/ & login using your account details.
STEP 2 – Click on Balance & Usage to view or edit your subscription details
STEP 3 – Click on Subscription Details
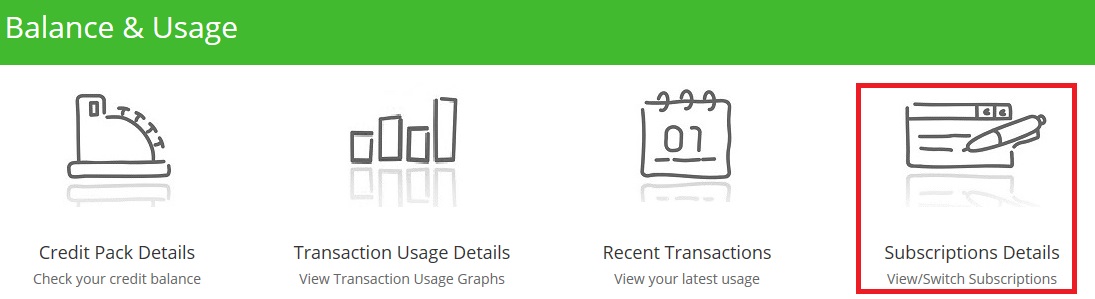
The My Subscription Details screen will show you all your subscription plan details. This includes a section called My Subscriptions where you can switch plans and Recent Orders where you can view the details of your payments, etc.
Should you wish to change your password for your login details you can do that by clicking on the “edit your password and account details” link directly above the My Subscriptions table.
If you just need to top up the current months plan due to unexpected usage – click on the “Click here to Top Up” link at the top.
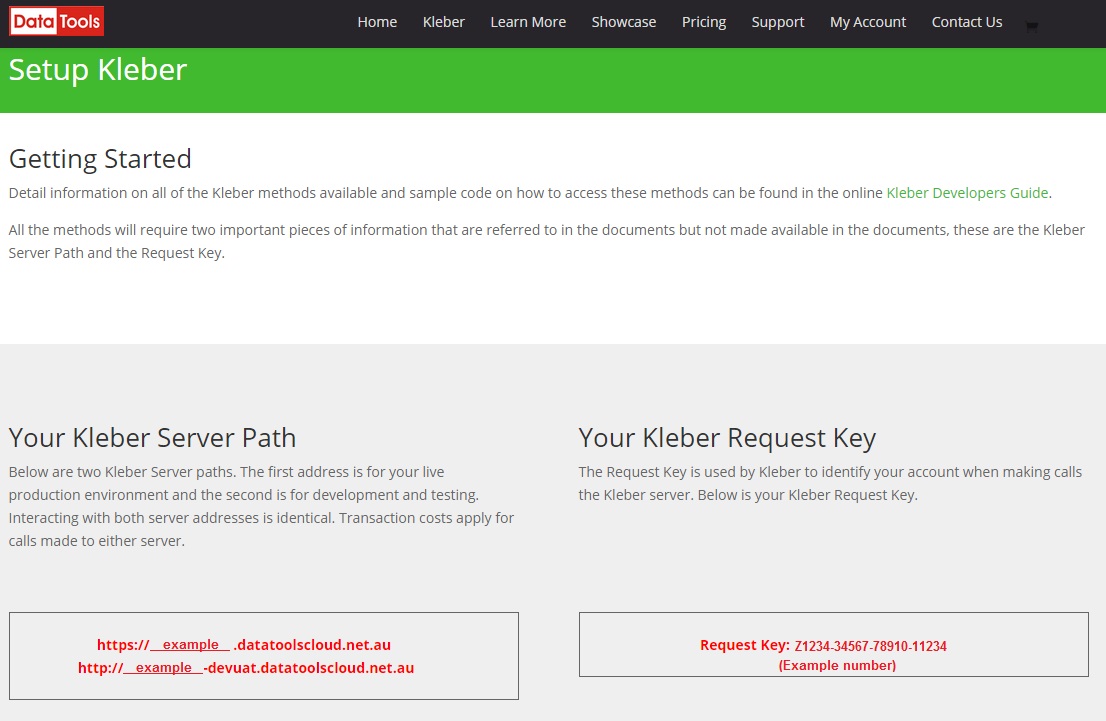
In the coding examples and technical details for all the Kleber methods you will find references to a ‘Request Key’ and ‘Server path’.
Every client is provided with a specific Request Key and two server path names (one for your live environment and one for your test environment) when you register with Kleber so that you can be identified when making calls to the Kleber server.
When developing any Kleber method you will need both your Request Key and a Server path to make the call to the Kleber server.
STEP 1. On any Kleber page click on My Account in the top menu bar.

STEP 2. This will bring you the account section of Kleber. You need to login to access your My Account details. Click on the Login? option on the right to enter your login details.
Once logged in you will see a Welcome message with your login name where the Login? message was.
STEP 3. To locate the Request Key &/or Server paths please click on the Setup Kleber button.
STEP 4. In here you will find information on how to get started in Kleber along with your specific Request Key and Server paths. (The image has an example only – yours will be specific to your account)
Where to next?
Once you have the Request Key and Server paths you can start to develop any method available in Kleber. To see a full list of all the methods available in Kleber click here.
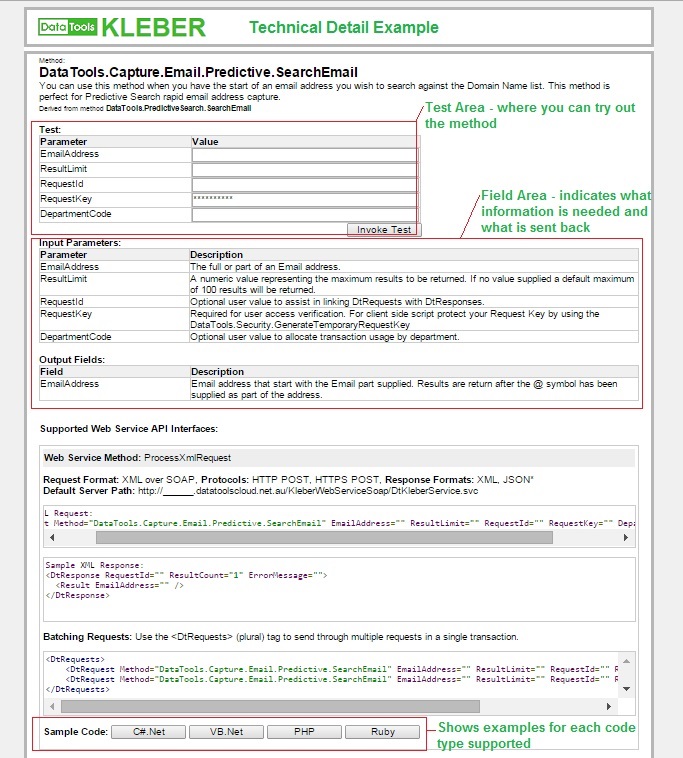
To learn more about a specific method, click on the one you are interested in and you will be taken to an overview page where you can try out the method for yourself.
If you need more technical details for that method, click on the “Technical Information>>” link at the top of the page. This page will provide you with information such as the Input Parameters required, the Output fields sent back, and coding examples for each language supported in Kleber.
Should you need any further assistance with setting up Kleber you can always check the coding examples made available at each method, or read the Kleber Developers Guide.
You can also contact our Client Services team on (02) 9687 4666 orsupport@datatools.com.au.
Note: Please ensure you thoroughly test the use of any Kleber method & are happy with the results before going into production. DataTools is charged by the data suppliers for use of every method – therefore ALL calls to ANY Kleber method will incur a cost. When you register with Kleber, DataTools provides you with $50 free credit to help with development and trialling of the service. Once that credit is used you will need to purchase a monthly subscription and/or top up to continue using the service, even for development purposes. Please check the Method Pricing List for all current costs. DataTools does not warrant or guarantee the quality of the results returned and will not be held responsible for any costs incurred by using a method. Should you have any questions please contact your Sales representative or the Client Services team.

March 30, 2017 – Kleber subscribers who currently use DataTools.Enhance.Address.Geocoding.AcxiomStandard.Append method will notice changes occurring to his method from Thursday April 6th 2017.
WHAT ARE THE CHANGES?
From the 6th April the above method will be retired – HOWEVER any code that uses this method will be automatically redirected to the new DataTools.Enhance.Address.Geocoding.Gnaf.Au.Append method that uses the industry standard G-NAF information. This means that from the 6th April the geocode returned for an address will be slightly different and the output Field of ‘GeocodeResultLevels’ will return different values.
WHAT DO I HAVE TO DO?
If you DO NOT use the codes in the output field of ‘GeocodeResultLevel’ – NO change will be required to your code.
As mentioned above your current method will automatically be redirected to the new DataTools G-NAF method. The ONLY difference is that the geocode returned for an address will now be for the middle of the property not for the street outside the property.
If your code has rules based on the information provided in the output Field of ‘GeocodeResultLevel’ – you will need to makes some changes.
For your information – the new codes returned in this output field will be:
- P = Premise or Building match
- S = Street level match
- L = Locality level match
CAN I TEST THIS BEFOREHAND?
Yes. From Thursday, 30th March 2017 the DEV environment for Kleber (http://kleber-devuat.datatoolscloud.net.au) will have the updated information available for testing. Here you will be able to check the automatic redirection and if necessary test the new GeocodeResultLevel output codes.
QUESTIONS?
Should you have any questions about this, please contact Support on (02) 9687 4666 or support@datatools.com.au.
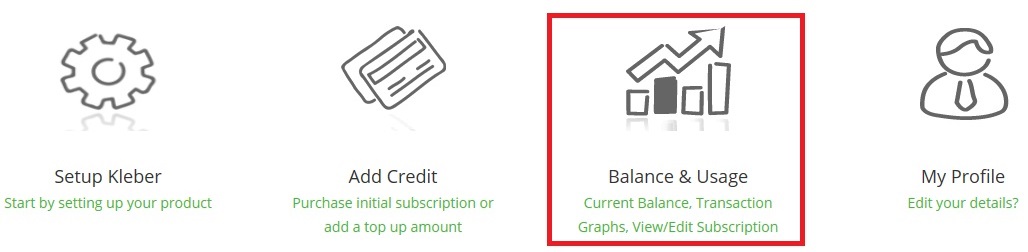
- Click on My Account in the main Kleber menu bar.
- Log in using your email and password for Kleber
- Click on Balance & Usage icon.

This will load a page that will provide you with an overview of your account as well as detailed usage information as outlined below:
- There are two gauges at the top which will show you the overall health of your account. (example below)

- Your Plan Information is listed along with your next payment date. (example below)

- There are Hourly, daily and weekly graphs and tables to breakdown your usage for you. (examples below)


- Site page statistics which show all the known pages Kleber is used on (example below)

- Recent Transactions – should you wish to see the most recent transactions click on the link under this heading.
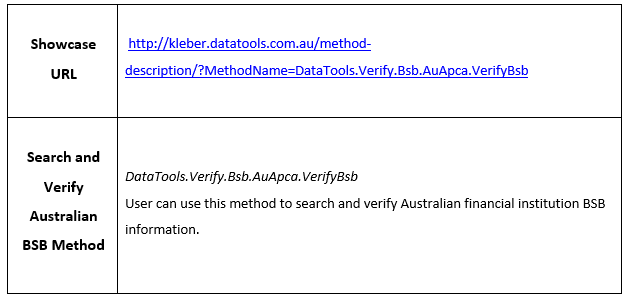
Step by step instructions for Searching and Verifying Australian Financial Institution BSB
Australian Financial Institution BSB Search and Verify Showcase
If you want to test Australian BSB showcase in real time you can use JS Fiddle. JS Fiddle is a helpful tool for developers to manage codes easily when testing codes. JS fiddle layouts web development programming language such as HTML, CSS and JavaScript in a three separate panels, making it simple for developers to work on all codes at once. In JS Fiddle, developers can collaborate and share codes
Click the JS fiddle button to start testing Australian BSB showcase
![]()
The steps below will show how we can search and verify Australian BSB.
Below is a basic HTML form that we will use for this step-by-step.
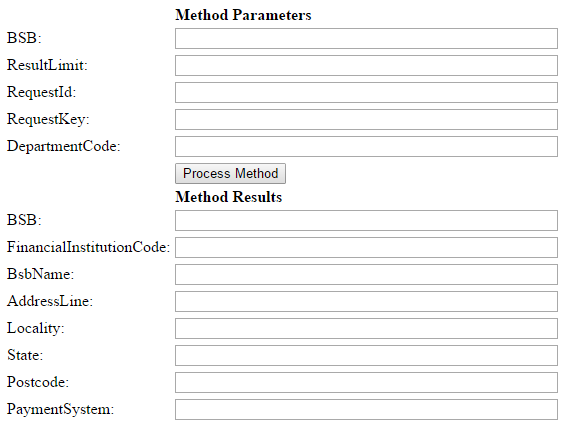
Fig-1: Australian BSB form template
Before testing the showcase, it is necessary to have a basic form for BSB search and verify. The code below is an example of a basic HTML form that would help you start testing the showcase. You can use it as a base or reference to create your own form.
Create a new AustralianBSB.html file and insert the code below.
<html>
<head>
</head>
				<body>
					<div>
						<table>
							<tr>
								<td></td>
								<td><b>Method Parameters</b></td>
							</tr>            <tr>
								<td>BSB:</td>
								<td><input name="BSB" id="inBSB" value="" type="text" size="50"/></td>
							<tr>
							<tr>
								<td>ResultLimit:</td>
								<td><input name="ResultLimit" id="inResultLimit" value="" type="text" size="50"/></td>
							<tr>
							<tr>
								<td>RequestId:</td>
								<td><input name="RequestId" id="inRequestId" value="" type="text" size="50"/></td>
							<tr>
							<tr>
								<td>RequestKey:</td>
								<td><input name="RequestKey" id="inRequestKey" value="" type="text" size="50"/></td>
							<tr>
							<tr>
								<td>DepartmentCode:</td>
								<td><input name="DepartmentCode" id="inDepartmentCode" value="" type="text" size="50"/></td>
							<tr>
							<tr>
								<td></td>
								<td><button name="ProcessButton" id="ProcessButton">Process Method</button></td>
							</tr>
							<tr>
								<td></td>
								<td><b>Method Results</b></td>
							</tr>
							<tr>
								<td>BSB:</td>
								<td><input name="BSB" id="BSB" type="text" size="50"/></td>
							<tr>
							<tr>
								<td>FinancialInstitutionCode:</td>
								<td><input name="FinancialInstitutionCode" id="FinancialInstitutionCode" type="text" size="50"/></td>
							<tr>
							<tr>
								<td>BsbName:</td>
								<td><input name="BsbName" id="BsbName" type="text" size="50"/></td>
							<tr>
							<tr>
								<td>AddressLine:</td>
								<td><input name="AddressLine" id="AddressLine" type="text" size="50"/></td>
							<tr>
							<tr>
								<td>Locality:</td>
								<td><input name="Locality" id="Locality" type="text" size="50"/></td>
							<tr>
							<tr>
								<td>State:</td>
								<td><input name="State" id="State" type="text" size="50"/></td>
							<tr>
							<tr>
								<td>Postcode:</td>
								<td><input name="Postcode" id="Postcode" type="text" size="50"/></td>
							<tr>
							<tr>
								<td>PaymentSystem:</td>
								<td><input name="PaymentSystem" id="PaymentSystem" type="text" size="50"/></td>
							<tr>
						</table>
					</div>
				</body>

				</html>
Note
- If you are testing Australian BSB Search and Verify Showcase using JS Fiddle tool, you do not have to copy and paste the code for Australian BSB form. The codes are already pasted on panels by default.
- On the code provided above, the ‘ID’ value for BSB field is “inBSB”.
<input name=”BSB” id=”inBSB“ type=”text” size=”50” />
- If you want to use your own Australian BSB form please keep in mind that the ‘ID’ value will be different.
Step 1
- You should have an Australian BSB form ready for testing. It is either the form we provided or your own form. The steps below will show you how we can verify BSB.
- Please paste the following code into your application. The code below adds the required JQuery libraries for the Ajax call. The CSS section adds a ‘processing’ gif so that there is a visual indication that the code is waiting for a reply from the server. Paste the following code into the <head> section of your page.
	<link href="http://kleber.datatoolscloud.net.au/jquery19/themes/base/jquery.ui.all.css" rel="stylesheet">
			<script src="http://kleber.datatoolscloud.net.au/jquery19/jquery-1.9.1.js" ></script>
			<script src="http://kleber.datatoolscloud.net.au/jquery19/ui/jquery.ui.core.js" ></script>
			<script src="http://kleber.datatoolscloud.net.au/jquery19/ui/jquery.ui.widget.js" ></script>
			<script src="http://kleber.datatoolscloud.net.au/jquery19/ui/jquery.ui.position.js" ></script>
			<script src="http://kleber.datatoolscloud.net.au/jquery19/ui/jquery.ui.autocomplete.js" ></script>
			<Script src="http://kleber.datatoolscloud.net.au/jquery19/ui/jquery.ui.menu.js" ></script>
			<style type="text/css">

		.ui-autocomplete-loading {
					background: white url('http://kleber.datatoolscloud.net.au/dt_processing_images/dt20x20.gif') right center no-repeat;
				}
			</style>
Step 2
Below is the first section of the JQuery .click event code. Paste the following code after the </style> tag from Step 1.
<script>
		$( function (){
        $('#ProcessButton').click(function()
        {
            var BSB = $('#inBSB').val();
            var ResultLimit = $('#inResultLimit').val();
            var RequestId = $('#inRequestId').val();
            var RequestKey = $('#inRequestKey').val();
            var DepartmentCode = $('#inDepartmentCode').val();
As you can see the script above, the click event function is used to trigger an element when “Process Method” button is pressed and released. Please note the element id used for verifying BSB is the ‘ProcessButton’. If you are using your own html form, replace ‘ProcessButton’ to match your own field name.
There are a number of settings that can be set for the Ajax call however we have found the below settings work best.
The URL parameter holds the web URL for the KLEBER web service. If it does not contain the correct URL, the Ajax call will not receive the required response.
Step 3
Below is where the Ajax call is performed to return the response.
Please see code below for an example. Copy and paste this code to your application after the sample from Step 2
 $.ajax({
                url: "https://kleber.datatoolscloud.net.au/KleberWebService/DtKleberService.svc/ProcessQueryStringRequest",
                dataType: "jsonp",
                type: "GET",
                contentType: "application/json; charset=utf-8",
                data: {

                    Method: "DataTools.Verify.Bsb.AuApca.VerifyBsb",
                    BSB: "" + BSB,
                    ResultLimit: "" + ResultLimit,
                    RequestId: "" + RequestId,
                    RequestKey: "" + RequestKey,
                    DepartmentCode: "" + DepartmentCode,
                    OutputFormat: "json"
                },
                success: function (data) {
                    $.map(data.DtResponse.Result, function (item) {
                        $('#BSB').val(item.BSB);
                        $('#FinancialInstitutionCode').val(item.FinancialInstitutionCode);
                        $('#BsbName').val(item.BsbName);
                        $('#AddressLine').val(item.AddressLine);
                        $('#Locality').val(item.Locality);
                        $('#State').val(item.State);
                        $('#Postcode').val(item.Postcode);
                        $('#PaymentSystem').val(item.PaymentSystem);
                    });
                }

			   });
        });
		});
  </script>
The example above uses the Kleber method DataTools.Verify.Bsb.AuApca.VerifyBsb to verify Australian BSB when a user types in the BSB. For more information on this method please see http://kleber.datatools.com.au/method-description/?MethodName=DataTools.Verify.Bsb.AuApca.VerifyBsb
A Request Key (RK) is assigned and provided after you successfully register your Kleber account. Every client has a unique Request Key and it should be protected when making a call to Kleber server. In order to protect your RK, you can generate a Temporary Request Key that can be used to test all Kleber methods.
The DataTools.Security.GenerateTemporaryRequestKey method will create an encrypted key that can last anywhere from 3 seconds up to 5 minutes based on your application needs. It helps prevent anyone from using your Kleber credit as it becomes unusable once it expires.
For more information about generate temporary keys, please click on this link: http://kleberwebsite.datatoolscloud.net.au/kleberbrowser/KleberMethodDescription.aspx?Method=DataTools.Security.GenerateTemporaryRequestKey
Note: Please keep in mind that it is important to protect your Request Key to prevent your account credentials being used without your permission.
Step by step instructions for Parsing and Formatting of Phone Number
Phone Number Parse and Format Showcase

If you want to test the Phone Number Parse and Format showcase in real time you can use JS Fiddle. JS Fiddle is a helpful tool for developers to manage codes easily when testing codes. JS fiddle layouts web development programming language such as HTML, CSS and JavaScript in a three separate panels, making it simple for developers to work on all codes at once. In JS Fiddle, developers can collaborate and share codes.
Click the JS fiddle button to start testing Phone Number Parse and Format showcase
![]()
The steps below will show how we can parse and format phone number.
Below is a basic HTML form that we will use for this step-by-step
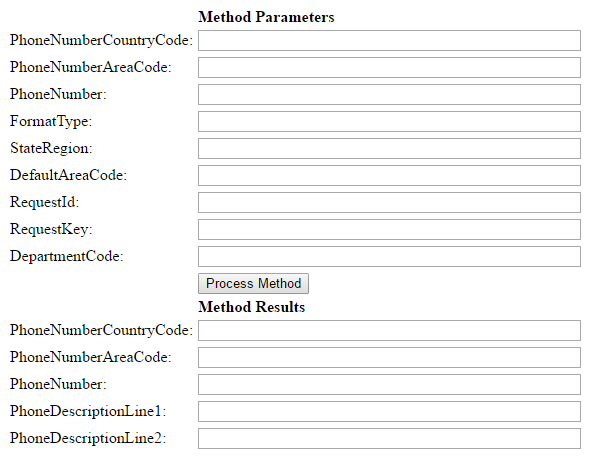
Fig-1: Phone Number Parse and Format form template
Before testing the showcase, it is necessary to have a basic form. The code below is an example of a basic HTML phone number parsing form that would help you start testing the showcase. You can use it as a base or reference to create your own form.
Create a new ParseAndFormatPhoneNumber.html file and insert the code below.
<html>
			<head>
			</head>
			<body>
				<div>
					<table>
						<tr>
							<td></td>
							<td><b>Method Parameters</b></td>
						</tr>            <tr>

							<td>PhoneNumberCountryCode:</td>
							<td><input name="PhoneNumberCountryCode" id="inPhoneNumberCountryCode" value="" type="text" size="50"/></td>
						<tr>
						<tr>
							<td>PhoneNumberAreaCode:</td>
							<td><input name="PhoneNumberAreaCode" id="inPhoneNumberAreaCode" value="" type="text" size="50"/></td>
						<tr>
						<tr>
							<td>PhoneNumber:</td>
							<td><input name="PhoneNumber" id="inPhoneNumber" value="" type="text" size="50"/></td>
						<tr>
						<tr>
							<td>FormatType:</td>
							<td><input name="FormatType" id="inFormatType" value="" type="text" size="50"/></td>
						<tr>
						<tr>
							<td>StateRegion:</td>
							<td><input name="StateRegion" id="inStateRegion" value="" type="text" size="50"/></td>
						<tr>
						<tr>
							<td>DefaultAreaCode:</td>
							<td><input name="DefaultAreaCode" id="inDefaultAreaCode" value="" type="text" size="50"/></td>
						<tr>
						<tr>
							<td>RequestId:</td>
							<td><input name="RequestId" id="inRequestId" value="" type="text" size="50"/></td>
						<tr>
						<tr>
							<td>RequestKey:</td>
							<td><input name="RequestKey" id="inRequestKey" value="" type="text" size="50"/></td>
						<tr>
						<tr>
							<td>DepartmentCode:</td>
							<td><input name="DepartmentCode" id="inDepartmentCode" value="" type="text" size="50"/></td>
						<tr>
						<tr>
							<td></td>
							<td><button name="ProcessButton" id="ProcessButton">Process Method</button></td>
						</tr>

						<tr>
							<td></td>
							<td><b>Method Results</b></td>
						</tr>
						<tr>
							<td>PhoneNumberCountryCode:</td>
							<td><input name="PhoneNumberCountryCode" id="PhoneNumberCountryCode" type="text" size="50"/></td>
						<tr>
						<tr>
							<td>PhoneNumberAreaCode:</td>
							<td><input name="PhoneNumberAreaCode" id="PhoneNumberAreaCode" type="text" size="50"/></td>
						<tr>
						<tr>
							<td>PhoneNumber:</td>
							<td><input name="PhoneNumber" id="PhoneNumber" type="text" size="50"/></td>
						<tr>
						<tr>
							<td>PhoneDescriptionLine1:</td>
							<td><input name="PhoneDescriptionLine1" id="PhoneDescriptionLine1" type="text" size="50"/></td>
						<tr>
						<tr>
							<td>PhoneDescriptionLine2:</td>
							<td><input name="PhoneDescriptionLine2" id="PhoneDescriptionLine2" type="text" size="50"/></td>
						<tr>

					</table>
				</div>
			</body>
			</html>
Note
- If you are testing the Phone Number Parse and Format Showcase using JS Fiddle tool, you do not have to copy and paste the code for Phone Number Parse and Format form. The codes are already pasted on panels by default.
- On the code provided above, the ‘ID’ value for the phone number field is “PhoneNumber”.
- <input name=”phonenumber” id=”PhoneNumber“ type=”text” size=”50” />
- If you want to use your own phone number form, please keep in mind that the ‘ID’ value will be different.
Step 1
- You should have a Phone Number Parse and Format form ready for testing. It is either the form we provided or your own form. The steps below will show you how we can parse and format phone numbers.
- Please paste the following code into your application. The code below adds the required JQuery libraries for the Ajax call. The CSS section adds a ‘processing’ gif so that there is a visual indication that the code is waiting for a reply from the server. Paste the following code into the <head> section of your page.
	<link href="http://kleber.datatoolscloud.net.au/jquery19/themes/base/jquery.ui.all.css" rel="stylesheet">
			<script src="http://kleber.datatoolscloud.net.au/jquery19/jquery-1.9.1.js" ></script>
			<script src="http://kleber.datatoolscloud.net.au/jquery19/ui/jquery.ui.core.js" ></script>
			<script src="http://kleber.datatoolscloud.net.au/jquery19/ui/jquery.ui.widget.js" ></script>
			<script src="http://kleber.datatoolscloud.net.au/jquery19/ui/jquery.ui.position.js" ></script>
			<script src="http://kleber.datatoolscloud.net.au/jquery19/ui/jquery.ui.autocomplete.js" ></script>
			<Script src="http://kleber.datatoolscloud.net.au/jquery19/ui/jquery.ui.menu.js" ></script>
			<style type="text/css">

		.ui-autocomplete-loading {
					background: white url('http://kleber.datatoolscloud.net.au/dt_processing_images/dt20x20.gif') right center no-repeat;
				}
			</style>
Step 2
Below is the first section of the JQuery .click event code. Paste the following code after the </style> tag from Step 1.
<script>
	  $( function (){
	  $('#ProcessButton').click(function()
			{
				var PhoneNumberCountryCode = $('#inPhoneNumberCountryCode').val();
				var PhoneNumberAreaCode = $('#inPhoneNumberAreaCode').val();
				var PhoneNumber = $('#inPhoneNumber').val();
				var FormatType = $('#inFormatType').val();
				var StateRegion = $('#inStateRegion').val();
				var DefaultAreaCode = $('#inDefaultAreaCode').val();
				var RequestId = $('#inRequestId').val();
				var RequestKey = $('#inRequestKey').val();
				var DepartmentCode = $('#inDepartmentCode').val();
As you can see the script above, the click event function is used to trigger an element when “Process Method” button is pressed and released. Please note the element id used for processing the method is the ‘ProcessButton’. If you are using your own form, replace ‘ProcessButton’ to match your own field name.
There are a number of settings that can be set for the Ajax call however we have found the below settings work best.
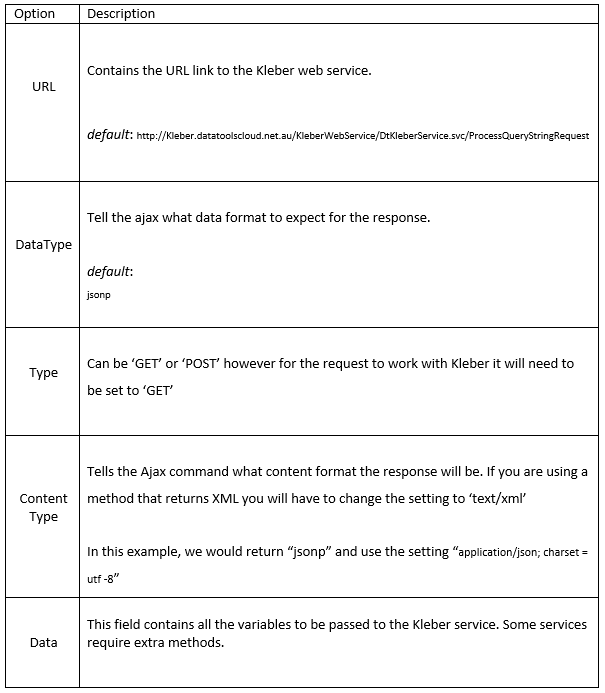
The URL parameter holds the web URL for the KLEBER web service. If it does not contain the correct URL, the Ajax call will not receive the required response.
Step 3
Below is where the Ajax call is performed to return the response.
Please see code below for an example. Copy and paste this code to your application after the sample from Step 2
     $.ajax({
                url: "https://kleber.datatoolscloud.net.au/KleberWebService/DtKleberService.svc/ProcessQueryStringRequest",
                dataType: "jsonp",
                type: "GET",
                contentType: "application/json; charset=utf-8",
                data: {

                    Method: "DataTools.Parse.PhoneNumber.Au.ParseAndFormat",
                    PhoneNumberCountryCode: "" + PhoneNumberCountryCode,
                    PhoneNumberAreaCode: "" + PhoneNumberAreaCode,
                    PhoneNumber: "" + PhoneNumber,
                    FormatType: "" + FormatType,
                    StateRegion: "" + StateRegion,
                    DefaultAreaCode: "" + DefaultAreaCode,
                    RequestId: "" + RequestId,
                    RequestKey: "" + RequestKey,
                    DepartmentCode: "" + DepartmentCode,
                    OutputFormat: "json"
                },
                success: function (data) {
                    $.map(data.DtResponse.Result, function (item) {
                        $('#PhoneNumberCountryCode').val(item.PhoneNumberCountryCode);
                        $('#PhoneNumberAreaCode').val(item.PhoneNumberAreaCode);
                        $('#PhoneNumber').val(item.PhoneNumber);
                        $('#PhoneDescriptionLine1').val(item.PhoneDescriptionLine1);
                        $('#PhoneDescriptionLine2').val(item.PhoneDescriptionLine2);
                    });
                }
            });
        });
		});

</script>
The example above uses the Kleber method DataTools.Parse. PhoneNumber.Au.ParseAndFormat to parse and format phone numbers when a user types in the phone number. For more information on this method see http://kleber.datatools.com.au/method-description/?MethodName=DataTools.Parse.PhoneNumber.Au.ParseAndFormat
For more detailed information about the parameters of this method please follow this link http://kleberwebsite.datatoolscloud.net.au/kleberbrowser/KleberMethodDescription.aspx?Method=DataTools.Parse.PhoneNumber.Au.ParseAndFormat
A Request Key (RK) is assigned and provided after you successfully register your Kleber account. Every client has a unique Request Key and it should be protected when making a call to Kleber server. In order to protect your RK, you can generate a Temporary Request Key that can be used to test all Kleber methods.
The DataTools.Security.GenerateTemporaryRequestKey method will create an encrypted key that can last anywhere from 3 seconds up to 5 minutes based on your application needs. It helps prevent anyone from using your Kleber credit as it becomes unusable once it expires.
For more information about generate temporary keys, please click on this link: http://kleberwebsite.datatoolscloud.net.au/kleberbrowser/KleberMethodDescription.aspx?Method=DataTools.Security.GenerateTemporaryRequestKey
Note: Please keep in mind that it is important to protect your Request Key to prevent your account credentials being used without your permission.
Step by step instructions for Parsing of Person’s Name
Parsing of Person’s Name Showcase
This document has been written for developers who want to implement Kleber Parsing of Person’s Name Showcase on their websites. To make the showcase easier to test and implement, this document provides code samples with each step of implementation that can be copied and paste into websites.
If you want to test the person’s name parse showcase in real time you can use JS Fiddle. JS Fiddle is a helpful tool for developers to manage codes easily when testing codes. JS fiddle layouts web development programming language such as HTML, CSS and JavaScript in a three separate panels, making it simple for developers to work on all codes at once. In JS Fiddle, developers can collaborate and share codes.
Click the JS fiddle button to start testing Parsing of Name showcase 
Below is a sample of person’s name form that we will use for this step-by-step.
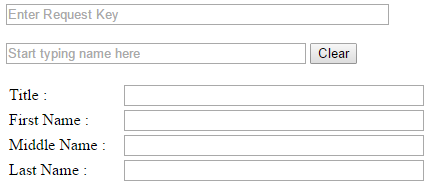
Fig-1: Person’s Name Parse form template
Before testing the showcase, a HTML form is necessary in testing to capture the person’s name to be parsed. The code below is an example of a basic HTML form that would help you start.
Create a new PersonsNameForm.html file and insert the code below.
<html>
<head></head>
<body>
<input name="RequestKey" id="rkey" value="" type="text" size="50" placeholder="Enter Request Key" />

<br><br>

<input id="parserline" name="ParserLine" type="text" style="width:300px;" placeholder="Start typing name here"/> <button type="button" id="clear">Clear</button>

<br><br>

<form>

<table id="allfields">
	<tr>
		<td>Title :</td>
		<td style="width: 10px"></td>
		<td><input id="Title" name="Title"  size="50" type="text" class="textbox" style="width:300px;" /></td>
	</tr>
	<tr>
		<td>First Name :</td>
		<td style="width: 10px"></td>
		<td><input id="FirstName" name="FirstName" size="50" type="text" class="textbox" style="width:300px;" /></td>
	</tr>
	<tr>
		<td>Middle Name :</td>
		<td style="width: 10px"></td>
		<td><input id="MiddleName" name="MiddleName" size="50" type="text" class="textbox" style="width:300px;" /></td>
	</tr>

		<tr>
		<td>Last Name :</td>
		<td style="width: 10px"></td>
		<td><input id="LastName" name="LastName" size="50" type="text" class="textbox" style="width:300px;" /></td>
	</tr>

</table>
</form>
</body>
</html>
Note
- If you are testing the Parsing of Person’s Name Showcase using JS Fiddle tool, you do not have to copy and paste the code of HTML form. The codes are already pasted on panels by default.
- If you want to use your own HTML form, please keep in mind that the ‘ID’ value will be different.
Step-by-step how to code JQuery with Kleber
Step 1
You should have a form ready for testing. It is either the form we provided or your own person’s name form.
Please paste the following code into your application. The code below adds the required JQuery libraries for the autocomplete Ajax call. The CSS section adds a ‘processing’ gif so that there is a visual indication that the code is waiting for a reply from the server. Paste the following code into the <head> section of your page.
<link href="http://kleber.datatoolscloud.net.au/jquery19/themes/base/jquery.ui.all.css" rel="stylesheet">
			<script src="http://kleber.datatoolscloud.net.au/jquery19/jquery-1.9.1.js" ></script>
			<script src="http://kleber.datatoolscloud.net.au/jquery19/ui/jquery.ui.core.js" ></script>
			<script src="http://kleber.datatoolscloud.net.au/jquery19/ui/jquery.ui.widget.js" ></script>
			<script src="http://kleber.datatoolscloud.net.au/jquery19/ui/jquery.ui.position.js" ></script>
			<script src="http://kleber.datatoolscloud.net.au/jquery19/ui/jquery.ui.autocomplete.js" ></script>
			<Script src="http://kleber.datatoolscloud.net.au/jquery19/ui/jquery.ui.menu.js" ></script>
			<style type="text/css">

		.ui-autocomplete-loading {
					background: white url('http://kleber.datatoolscloud.net.au/dt_processing_images/dt20x20.gif') right center no-repeat;
				}
			</style>
Step 2
Below is the first section of the JQuery $(function). Paste the following code after the </style> tag from Step 1.
		$(function (){


				$('#clear').click(function(){
					$("#parserline").val("");
					$("#Title").val("");
					$("#FirstName").val("");
					$("#MiddleName").val("");
					$("#LastName").val("");


				});

				$('#parserline').keyup(function(){
				var parseline = $("#parserline").val();
				var rkey = $('#rkey').val();
There are a number of settings that can be set for the Ajax call however we have found the below settings work best.
The URL parameter holds the web URL for the KLEBER web service. If it does not contain the correct URL, the Ajax call will not receive the required response.
Step 3
Below is where the Ajax call is performed to parse the name input by user.
Please see code below for an example. Copy and paste this code to your application after the sample from Step 2.
	$.ajax(
				{
					url: "http://Kleber.datatoolscloud.net.au/KleberWebService/DtKleberService.svc/ProcessQueryStringRequest",
					dataType: "jsonp",
					crossDomain: true,
					data:
					{
						OutputFormat:"json",
						PersonLine1:parseline,
						PersonLine2:"",
						PersonLine3:"",
						PersonLine4:"",
						PersonLine5:"",
						PersonLine6:"",
						Method:"DataTools.Parse.PersonName.Parse",
						RequestKey:rkey
					},
				success: function (data)
					{
						$.map(data.DtResponse.Result, function (item)
						{
							$("#Title").val(item.Person1Title);
							$("#FirstName").val(item.Person1FirstName);
							$("#MiddleName").val(item.Person1MiddleNames);
							$("#LastName").val(item.Person1LastName);
						});
					}
				});
			});
		});
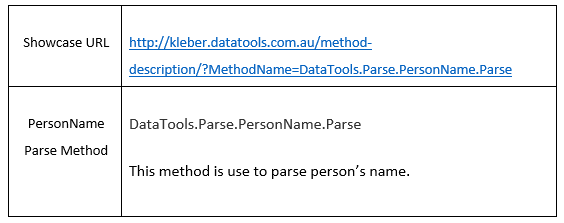
The example above uses the Kleber method DataTools.Parse.PersonName.Parse to parse a person’s name typed in by user.
For more information of this method see http://kleber.datatools.com.au/method-description/?MethodName=DataTools.Parse.PersonName.Parse
A Request Key (RK) is assigned and provided after you successfully register your Kleber account. Every client has a unique Request Key and it should be protected when making a call to Kleber server. In order to protect your RK, you can generate a Temporary Request Key that can be used to test all Kleber methods.
The DataTools.Security.GenerateTemporaryRequestKey method will create an encrypted key that can last anywhere from 3 seconds up to 5 minutes based on your application needs. It helps prevent anyone from using your Kleber credit as it becomes unusable once it expires.
For more information about generate temporary keys, please click on this link: http://kleberwebsite.datatoolscloud.net.au/kleberbrowser/KleberMethodDescription.aspx?Method=DataTools.Security.GenerateTemporaryRequestKey
Note: Please keep in mind that it is important to protect your Request Key to prevent your account credentials being used without your permission.
Step by step instructions for Parsing of Australian Address
Parsing of Australian Address Showcase
If you want to test the address parse showcase in real time you can use JS Fiddle. JS Fiddle is a helpful tool for developers to manage codes easily when testing codes. JS fiddle layouts web development programming language such as HTML, CSS and JavaScript in a three separate panels, making it simple for developers to work on all codes at once. In JS Fiddle, developers can collaborate and share codes.
Click the JS fiddle button to start testing Address Parse showcase
Below is an address form that we will use for this step-by-step.
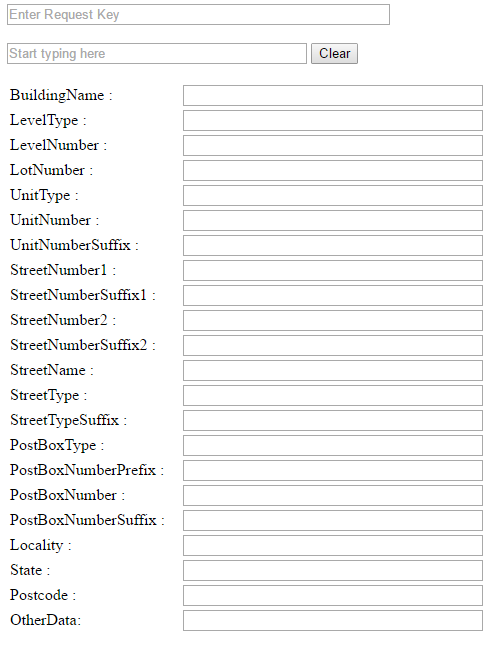
Fig-1: Address Parse form template
Before testing the showcase, an address form is necessary in testing to capture the address to be parsed. The code below is an example of a basic HTML address form that would help you start testing Address Parse showcase. You can use it as a base or reference to create your own address form.
Create a new AddressForm.html file and insert the code below.
<html>
<head>
</head>
<body>
<input name="RequestKey" id="rkey" value="" type="text" size="50" placeholder="Enter Request Key"/>
<br><br>
<input id="parserline" name="ParserLine" type="text" style="width:300px;" placeholder="Start typing here"/> <button type="button" id="clear">Clear</button>


<br><br>
<form>
	<table id="allfields">
		<tr>
			<td>BuildingName :</td>
			<td style="width: 10px"></td>
			<td><input id="BuildingName " name="BuildingName"  size="50" type="text" class="textbox" style="width:300px;" /></td>
		</tr>
		<tr>
			<td>LevelType :</td>
			<td style="width: 10px"></td>
			<td><input id="LevelType" name="LevelType" size="50" type="text" class="textbox" style="width:300px;" /></td>
		</tr>
		<tr>
			<td>LevelNumber :</td>
			<td style="width: 10px"></td>
			<td><input id="LevelNumber" name="LevelNumber" size="50" type="text" class="textbox" style="width:300px;" /></td>
		</tr>
		<tr>
			<td>LotNumber :</td>
			<td style="width: 10px"></td>
			<td><input id="LotNumber" name="LotNumber" size="50" type="text" class="textbox" style="width:300px;" /></td>
		</tr>
		<tr>
			<td>UnitType :</td>
			<td style="width: 10px"></td>
			<td><input id="UnitType" name="UnitType" size="50" type="text" class="textbox" style="width:300px;" /></td>
		</tr>
		<tr>
			<td>UnitNumber :</td>
			<td style="width: 10px"></td>
			<td><input id="UnitNumber" name="UnitNumber" size="50" type="text" class="textbox" style="width:300px;" /></td>
		</tr>
		<tr>
			<td>UnitNumberSuffix :</td>
			<td style="width: 10px"></td>
			<td><input id="UnitNumberSuffix" name="UnitNumberSuffix" size="50" type="text" class="textbox" style="width:300px;" /></td>
		</tr>
		<tr>
			<td>StreetNumber1 :</td>
			<td style="width: 10px"></td>
			<td><input id="StreetNumber1" name="StreetNumber1" size="50" type="text" class="textbox" style="width:300px;" /></td>
		</tr>
		<tr>
			<td>StreetNumberSuffix1 :</td>
			<td style="width: 10px"></td>
			<td><input id="StreetNumberSuffix1" name="StreetNumberSuffix1" size="50" type="text" class="textbox" style="width:300px;" /></td>
		</tr>
		<tr>
			<td>StreetNumber2 :</td>
			<td style="width: 10px"></td>
			<td><input id="StreetNumber2" name="StreetNumber2" size="50" type="text" class="textbox" style="width:300px;" /></td>
		</tr>
		<tr>
			<td>StreetNumberSuffix2 :</td>
			<td style="width: 10px"></td>
			<td><input id="StreetNumberSuffix2" name="StreetNumberSuffix2" size="50" type="text" class="textbox" style="width:300px;" /></td>
		</tr>
		<tr>
			<td>StreetName :</td>
			<td style="width: 10px"></td>
			<td><input id="StreetName" name="StreetName" size="50" type="text" class="textbox" style="width:300px;" /></td>
		</tr>
		<tr>
			<td>StreetType :</td>
			<td style="width: 10px"></td>
			<td><input id="StreetType" name="StreetType" size="50" type="text" class="textbox" style="width:300px;" /></td>
		</tr>
		<tr>
			<td>StreetTypeSuffix :</td>
			<td style="width: 10px"></td>
			<td><input id="StreetTypeSuffix" name="StreetTypeSuffix" size="50" type="text" class="textbox" style="width:300px;" /></td>
		</tr>
		<tr>
			<td>PostBoxType :</td>
			<td style="width: 10px"></td>
			<td><input id="PostBoxType" name="PostBoxType" size="50" type="text" class="textbox" style="width:300px;" /></td>
		</tr>
		<tr>
			<td>PostBoxNumberPrefix :</td>
			<td style="width: 10px"></td>
			<td><input id="PostBoxNumberPrefix" name="PostBoxNumberPrefix" size="50" type="text" class="textbox" style="width:300px;" /></td>
		</tr>
		<tr>
			<td>PostBoxNumber :</td>
			<td style="width: 10px"></td>
			<td><input id="PostBoxNumber" name="PostBoxNumber" size="50" type="text" class="textbox" style="width:300px;" /></td>
		</tr>
		<tr>
			<td>PostBoxNumberSuffix :</td>
			<td style="width: 10px"></td>
			<td><input id="PostBoxNumberSuffix" name="PostBoxNumberSuffix" size="50" type="text" class="textbox" style="width:300px;" /></td>
		</tr>
		<tr>
			<td>Locality :</td>
			<td style="width: 10px"></td>
			<td><input id="Locality" name="Locality" size="50" type="text" class="textbox" style="width:300px;" /></td>
		</tr>
		<tr>
			<td>State :</td>
			<td style="width: 10px"></td>
			<td><input id="State" name="State" size="50" type="text" class="textbox" style="width:300px;" /></td>
		</tr>
		<tr>
			<td>Postcode :</td>
			<td style="width: 10px"></td>
			<td><input id="Postcode" name="Postcode" size="50" type="text" class="textbox" style="width:300px;" /></td>
		</tr>
		<tr>
			<td>OtherData:</td>
			<td style="width: 10px"></td>
			<td><input id="OtherData " name="OtherData size=50" type="text" class="textbox" style="width:300px;" /></td>
		</tr>

	</table>
</form>
</body>
</html>
Step-by-step how to code JQuery with Kleber
Step 1
You should have an address form ready for testing. It is either the form we provided or your own address form.
Please paste the following code into your application. The code below adds the required JQuery libraries for the autocomplete Ajax call. The CSS section adds a ‘processing’ gif so that there is a visual indication that the code is waiting for a reply from the server. Paste the following code into the <head> section of your page.
<link href="http://kleber.datatoolscloud.net.au/jquery19/themes/base/jquery.ui.all.css" rel="stylesheet">
		<script src="http://kleber.datatoolscloud.net.au/jquery19/jquery-1.9.1.js" ></script>
		<script src="http://kleber.datatoolscloud.net.au/jquery19/ui/jquery.ui.core.js" ></script>
		<script src="http://kleber.datatoolscloud.net.au/jquery19/ui/jquery.ui.widget.js" ></script>
		<script src="http://kleber.datatoolscloud.net.au/jquery19/ui/jquery.ui.position.js" ></script>
		<script src="http://kleber.datatoolscloud.net.au/jquery19/ui/jquery.ui.autocomplete.js" ></script>
		<Script src="http://kleber.datatoolscloud.net.au/jquery19/ui/jquery.ui.menu.js" ></script>
		<style type="text/css">

		.ui-autocomplete-loading
                     {
		        background: white url('http://kleber.datatoolscloud.net.au/dt_processing_images/dt20x20.gif') right center no-repeat;
		     }
                </style>
Step 2
Below is the first section of the JQuery $(function). Paste the following code after the </style> tag from Step 1.
$(function (){


				$('#clear').click(function(){
					$("#parserline").val("");
					$("#BuildingName").val("");
					$("#LevelType").val("");
					$("#LevelNumber").val("");
					$("#LotNumber").val("");
					$("#UnitType").val("");
					$("#UnitNumber").val("");
					$("#UnitNumberSuffix").val("");
					$("#StreetNumber1").val("");
					$("#StreetNumberSuffix1").val("");
					$("#StreetNumber2").val("");
					$("#StreetNumberSuffix2").val("");
					$("#StreetName").val("");
					$("#StreetType").val("");
					$("#StreetTypeSuffix").val("");
					$("#PostBoxType").val("");
					$("#PostBoxNumberPrefix").val("");
					$("#PostBoxNumber").val("");
					$("#PostBoxNumberSuffix").val("");
					$("#Locality").val("");
					$("#State").val("");
					$("#Postcode").val("");
					$("#OtherData").val("");

				});

				$('#parserline').keyup(function(){
				var parseline = $("#parserline").val();
				var rkey = $('#rkey').val();
There are a number of settings that can be set for the Ajax call however we have found the below settings work best.
The URL parameter holds the web URL for the KLEBER web service. If it does not contain the correct URL, the Ajax call will not receive the required response.
Step 3
Below is where the Ajax call is performed to parse the address input by user.
Please see code below for an example. Copy and paste this code to your application after the sample from Step 2.
		$.ajax(
				{
					url: "http://Kleber.datatoolscloud.net.au/KleberWebService/DtKleberService.svc/ProcessQueryStringRequest",
					dataType: "jsonp",
					crossDomain: true,
					data:
					{
						OutputFormat:"json",
						AddressLine1:parseline,
						AddressLine2:"",
						AddressLine3:"",
						AddressLine4:"",
						AddressLine5:"",
						AddressLine6:"",
						Method:"DataTools.Parse.Address.Au.Parse",
						RequestKey:rkey
					},
				                success: function (data)
					{
						$.map(data.DtResponse.Result, function (item)
						{

							$("#BuildingName").val(item.BuildingName );
							$("#LevelType").val(item.LevelType );
							$("#LevelNumber").val(item.LevelNumber );
							$("#LotNumber").val(item.LotNumber );
							$("#UnitType").val(item.UnitType );
							$("#UnitNumber").val(item.UnitNumber );
							$("#UnitNumberSuffix").val(item.UnitNumberSuffix );
							$("#StreetNumber1").val(item.StreetNumber1 );
							$("#StreetNumberSuffix1").val(item.StreetNumberSuffix1 );
							$("#StreetNumber2").val(item.StreetNumber2 );
							$("#StreetNumberSuffix2").val(item.StreetNumberSuffix2 );
							$("#StreetName").val(item.StreetName );
							$("#StreetType").val(item.StreetType );
							$("#StreetTypeSuffix").val(item.StreetTypeSuffix );
							$("#PostBoxType").val(item.PostBoxType );
							$("#PostBoxNumberPrefix").val(item.PostBoxNumberPrefix );
							$("#PostBoxNumber").val(item.PostBoxNumber );
							$("#PostBoxNumberSuffix").val(item.PostBoxNumberSuffix );
							$("#Locality").val(item.Locality );
							$("#State").val(item.State );
							$("#Postcode").val(item.Postcode );
							$("#OtherData").val(item.OtherData);

						});
					}
				});

		});

	});
The example above uses the Kleber method DataTools.Parse.Address.Au.Parse to parse address typed in by user. For more information on this method see http://kleber.datatools.com.au/method-description/?MethodName=DataTools.Parse.Address.Au.Parse
A Request Key (RK) is assigned and provided after you successfully register your Kleber account. Every client has a unique Request Key and it should be protected when making a call to Kleber server. In order to protect your RK, you can generate a Temporary Request Key that can be used to test all Kleber methods.
The DataTools.Security.GenerateTemporaryRequestKey method will create an encrypted key that can last anywhere from 3 seconds up to 5 minutes based on your application needs. It helps prevent anyone from using your Kleber credit as it becomes unusable once it expires.
For more information about generate temporary keys, please click on this link: http://kleberwebsite.datatoolscloud.net.au/kleberbrowser/KleberMethodDescription.aspx?Method=DataTools.Security.GenerateTemporaryRequestKey
Note: Please keep in mind that it is important to protect your Request Key to prevent your account credentials being used without your permission.
Step by step instructions for Phone Number Verification
Phone Number Verification Showcase
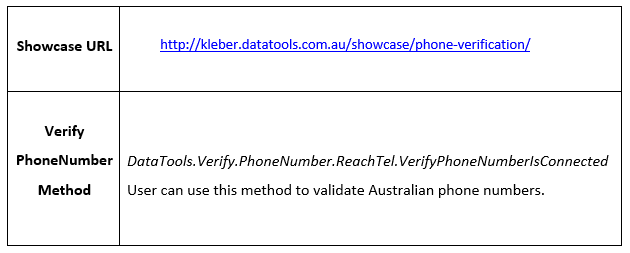
[HTMLGrab localfolder=”iFrames” src=”ButtonScripts.htm”]
If you want to test the Phone Verification showcase in real time you can use JS Fiddle. JS Fiddle is a helpful tool for developers to manage codes easily when testing codes. JS fiddle layouts web development programming language such as HTML, CSS and JavaScript in a three separate panels, making it simple for developers to work on all codes at once. In JS Fiddle, developers can collaborate and share codes.
Click the JS fiddle button to start testing Phone Number Verify showcase
The steps below will show how we can validate phone number.
Below is a basic Phone Number Verify form that we will use for this step-by-step.
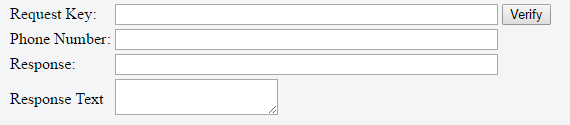
Fig-1: Phone Number Verification form template
Before testing the showcase, it is necessary to have a basic form for phone number verification. The code below is an example of a basic HTML verify phone number form that would help you start testing the Phone Number Verification Showcase. You can use it as a base or reference to create your own form.
Create a new VerifyPhoneNumber.html file and insert the code below.
<html>
     </head>
     <body>
     <div >
     <table>
           <tr>
           <td>
               Request Key:
           </td>
           <td>
               <input name="RequestKey" id="rkey" value="" type="text" size="50"/>
               <button name="Verifybtn" id="verifybtn">Verify</button>
          </td>
          </tr>
          <tr>
          <td>
               Phone Number:
          </td>
          <td>
               <input name="phonenumber" id="phonenumber" type="text" size="50"/></td>
          </tr>
          <tr>
          <td>
               Response:
         </td>
          <td>
             <input name="Resp" id="resp" type="text" size="50"/></td>
         </tr>
         <tr>
         <td>
            Response Text</td>
         <td>
            <textarea id="textresponse"></textarea></td>
         </tr>
      </table>
      </div>
      </body>
</html>
Note
- If you are testing the Phone Number Verification Showcase using JS Fiddle tool, you do not have to copy and paste the code for Phone Number Verification form. The codes are already pasted on panels by default.
- On the code provided above, the ‘ID’ value for the phone number field is “phonenumber”.
- <input name=”phonenumber” id=”phonenumber“ type=”text” size=”50” />
- If you want to use your own phone number form please keep in mind that the ‘ID’ value will be different.
Step 1
- You should have a Phone Number Verification form ready for testing. It is either the form we provided or your own form. The steps below will show you how we can verify phone numbers.
- Please paste the following code into your application. The code below adds the required JQuery libraries for the Ajax call. The CSS section adds a ‘processing’ gif so that there is a visual indication that the code is waiting for a reply from the server. Paste the following code into the <head> section of your page.
<link href="http://kleber.datatoolscloud.net.au/jquery19/themes/base/jquery.ui.all.css" rel="stylesheet">
<script src="http://kleber.datatoolscloud.net.au/jquery19/jquery-1.9.1.js" ></script>
<script src="http://kleber.datatoolscloud.net.au/jquery19/ui/jquery.ui.core.js" ></script>
<script src="http://kleber.datatoolscloud.net.au/jquery19/ui/jquery.ui.widget.js" ></script>
<script src="http://kleber.datatoolscloud.net.au/jquery19/ui/jquery.ui.position.js" ></script>
<script src="http://kleber.datatoolscloud.net.au/jquery19/ui/jquery.ui.autocomplete.js" ></script>
<Script src="http://kleber.datatoolscloud.net.au/jquery19/ui/jquery.ui.menu.js" ></script>
<style type="text/css">


.ui-autocomplete-loading
{
	background: white URL('http://kleber.datatoolscloud.net.au/dt_processing_images/dt20x20.gif') right center no-repeat;
}


</style>
Step 2
Below is the first section of the JQuery .click event code. Paste the following code after the </style> tag from Step 1.
<script>
		$( function (){
		$('#verifybtn').click(function()
		{

		var requestkey = $('#rkey').val();
		var phonenumber = $('#phonenumber').val();
		alert(requestkey + " " + phonenumber);
As you can see the script above, the click event function is used to trigger an element when “Verify” button is pressed and released. Please note the element id used for phone verification is the ‘verifybtn’. If you are using your own phone verification form, replace ‘verifybtn’ to match your own field name.
There are a number of settings that can be set for the Ajax call however we have found the below settings work best.
The URL parameter holds the web URL for the KLEBER web service. If it does not contain the correct URL, the Ajax call will not receive the required response.
Step 3
Below is where the Ajax call is performed to return the response.
Please see code below for an example. Copy and paste this code to your application after the sample from Step 2
$.ajax({
				url: "https://Kleber.datatoolscloud.net.au/KleberWebService/DtKleberService.svc/ProcessQueryStringRequest",
				dataType: "jsonp",

				type: "GET",
				contentType: "application/json; charset=utf-8",
				data: {

					OutputFormat:"json",
					Method:"DataTools.Verify.PhoneNumber.ReachTel.VerifyPhoneNumberIsConnected",
					PhoneNumber: $('#phonenumber').val() ,
					RequestKey:requestkey
				},

				success: function (data){
					$.map(data.DtResponse.Result, function (item)
					{

					$('#resp').val(item.StatusCode);
					$('#textresponse').val(item.StatusDescription);
				   });
           }
		   });
	   });
	 });
The example above uses the Kleber method DataTools.Verify.PhoneNumber.ReachTel.VerifyPhoneNumberIsConnected to validate phone numbers when a user types in the phone number. For more information on this method see
When a user clicks “Verify” button, Kleber will return a response attributes and codes. For a detailed information about Response Attributes and Codes, please click on this link:
A Request Key (RK) is assigned and provided after you successfully register your Kleber account. Every client has a unique Request Key and it should be protected when making a call to Kleber server. In order to protect your RK, you can generate a Temporary Request Key that can be used to test all Kleber methods.
The DataTools.Security.GenerateTemporaryRequestKey method will create an encrypted key that can last anywhere from 3 seconds up to 5 minutes based on your application needs. It helps prevent anyone from using your Kleber credit as it becomes unusable once it expires.
For more information about generate temporary keys, please click on this link: http://kleberwebsite.datatoolscloud.net.au/kleberbrowser/KleberMethodDescription.aspx?Method=DataTools.Security.GenerateTemporaryRequestKey
Note: Please keep in mind that it is important to protect your Request Key to prevent your account credentials being used without your permission.
Step by step instructions for Verify and Repair Address
Verify and Repair Showcase
This document has been written for developers who want to implement Kleber Verify and Repair address on their websites. Sample codes with each step are provided on this document to make the testing and implementation easier.
If you want to test the predictive showcase in real time you can use JS Fiddle. JS Fiddle is a helpful tool for developers to manage codes easily when testing codes. JS fiddle layouts web development programming language such as HTML, CSS and JavaScript in a three separate panels, making it simple for developers to work on all codes at once. In JS Fiddle, developers can collaborate and share codes.
Click the JS fiddle button to start testing verify and repair showcase using JS Fiddle tool
[HTMLGrab localfolder=”iFrames” src=”ButtonScripts.htm”]
The steps below will show how we can add predictive address search to the address line field.
Step-by-step how to code JQuery with Kleber
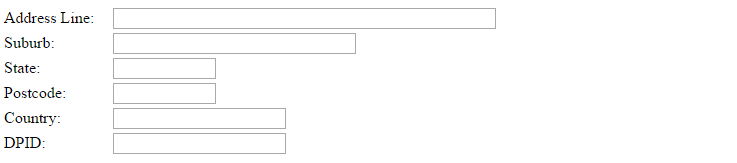
Fig-1: form template for verify and repair methods
The code below is an example of a basic HTML address form that would help you start testing the Verify and Repair Showcase. You can use it as a base or reference to create your own address form.
Create a new VerifyRepairAddressForm.html file and insert the code below.
<html>
	<head>
		<style type="text/css">
			#div{
				color: rgb(0, 0, 0);
				font-family: 'Times New Roman';
				font-size: medium;
				font-style: normal;
				font-variant: normal;
				font-weight: normal;
				letter-spacing: normal;
				line-height: normal;
				orphans: auto;
				text-align: start;
				text-indent: 0px;
				text-transform: none;
				white-space: normal;
				widows: 1;
				word-spacing: 0px;
				-webkit-text-stroke-width: 0px;
				padding-left: 250px;
				background-color: rgb(255, 255, 255);
			}
		</style>
	</head>
	<body>
		<form>
			<div>
				<table>
					<tr>
						<td>Address Line:</td>
						<td style="width: 10px;"></td>
						<td>
						<input name="Address line 1" id="addline1" type="text" size="50" />
						</td>
					</tr>
					<tr>
						<td>Suburb:</td>
						<td style="width: 10px;"></td>
						<td><input name="Suburb" id="suburb" type="text" size="30" /></td>
					</tr>
					<tr>
						<td>State:</td>
						<td style="width: 10px;"></td>
						<td><input name="State" id="state" type="text" size="10" /></td>
					</tr>
					<tr>
						<td>Postcode:</td>
						<td style="width: 10px;"></td>
						<td>
						<input name="Postcode" id="postcode" type="text" size="10" /></td>
					</tr>
					<tr>
						<td>Country:</td>
						<td style="width: 10px;"></td>
						<td><input name="Country" id="country" type="text" size="20" /></td>
					</tr>
						<tr>
						<td>DPID:</td>
						<td style="width: 10px;"></td>
						<td><input name="Dpid" id="dpid" type="text" size="20" /></td>
					</tr>
				</table>
			</div>
		</form>
	</body>
</html>
Note
- If you are testing the Verify and Repair Showcase using JS Fiddle tool, you do not have to copy and paste the code of HTML address form. The codes are already pasted on panels by default.
- The sample code in JS Fiddle for Verify and Repair method is the continuation of predictive address search.
- On the code provided above, the ‘ID’ value for the address line field is “addline1”.
<input name=”Address line 1” id=”addline1“ type=”text” size=”50” />
If you want to use your own address form please keep in mind that the ‘ID’ value will be different.
Step 1
You should have an address form ready for testing. It is either the form we provided or your own address form. Please make sure the following code is pasted into your application. The code below adds the required JQuery libraries for the autocomplete Ajax call. The CSS section adds a ‘processing’ gif so that there is a visual indication that the code is waiting for a reply from the server. Paste the following code into the <head> section of your page.
<link href="http://kleber.datatoolscloud.net.au/jquery19/themes/base/jquery.ui.all.css" rel="stylesheet">
	<script src="http://kleber.datatoolscloud.net.au/jquery19/jquery-1.9.1.js" ></script>
	<script src="http://kleber.datatoolscloud.net.au/jquery19/ui/jquery.ui.core.js" ></script>
	<script src="http://kleber.datatoolscloud.net.au/jquery19/ui/jquery.ui.widget.js" ></script>
	<script src="http://kleber.datatoolscloud.net.au/jquery19/ui/jquery.ui.position.js" ></script>
	<script src="http://kleber.datatoolscloud.net.au/jquery19/ui/jquery.ui.autocomplete.js" ></script>
	<script src="http://kleber.datatoolscloud.net.au/jquery19/ui/jquery.ui.menu.js" ></script>
	<style type="text/css">

	.ui-autocomplete-loading
{
background: white URL('http://kleber.datatoolscloud.net.au/dt_processing_images/dt20x20.gif') right center no-repeat;
 }
	</style>
Step 2
The code below uses focus out on postcode field. Paste the following code after the Ajax snippet code for Retrieve Address from the previous document (Previous Australian Address Capture Code Walkthrough).
$('#postcode').on('focusout', function(){

      var DPID = $('#dpid').val();
      var ADDLINE = $('#addline1').val();
      var SUB = $('#suburb').val();
	  var STATE = $('#state').val();
	  var PCODE = $('#postcode').val();

    if((DPID == "")&&(ADDLINE != ""))
		{
			if((ADDLINE != "")&&(SUB != "")&&(STATE != "")&&(PCODE != ""))
				{
					alert("This is Verify")
Please Note: On the code snippet above, the alert is only for testing purposes please remove during production.
There are a number of settings that can be set for the Ajax call however we have found the below settings work best.
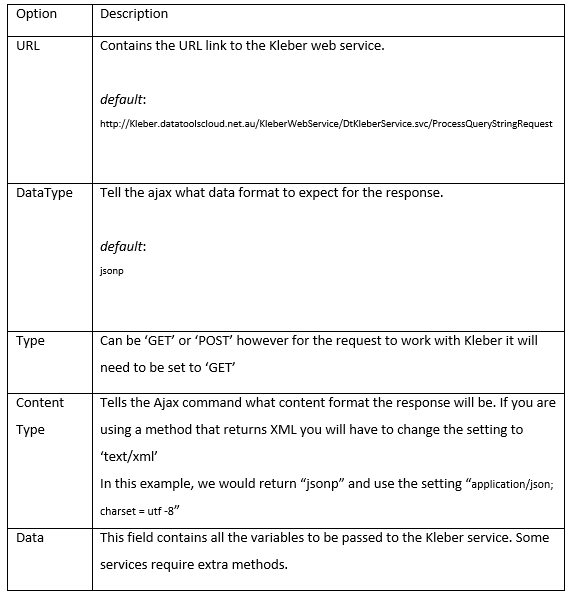
The URL parameter holds the web URL for the KLEBER web service. If it does not contain the correct URL, the Ajax call will not receive the required response.
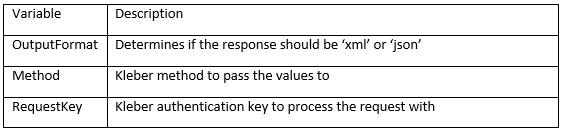
Step 3
The code below is where the Ajax call is performed to verify and/or repair the Australian address. Copy and paste this code to your application after the sample from Step 2.
$.ajax(
				{
					url: "https://Kleber.datatoolscloud.net.au/KleberWebService/DtKleberService.svc/ProcessQueryStringRequest",
					dataType: "jsonp",
					type: "GET",
					contentType: "application/json; charset=utf-8",
					data: {
						OutputFormat:"json", Method:"DataTools.Verify.Address.AuPaf.VerifyAddress", AddressLine1: $('#addline1').val(),
						Locality: $('#suburb').val(), State: $('#state').val(), Postcode: $('#postcode').val(),
						RequestKey:""
						  },
					success: function (data)
						{
						$.map(data.DtResponse.Result, function (item)
							{
							if(item.DPID == "")
									{
									alert("Verify failed so running repair");
									RepairAddress(this);
									}
					else
							{
							$('#addline1').val(item.AddressLine);
							$('#suburb').val(item.Locality);
							$('#state').val(item.State);
							$('#postcode').val(item.Postcode);
							$('#dpid').val(item.DPID);
							}
						});
					}
			});
			}
					else
						{
						alert("Running Repair")
						RepairAddress(this);
						}
					}
		    });
Note: On the code snippet above, the alert is only for testing purposes please remove during production.
The example above uses the Kleber method DataTools.Verify.Address.AuPaf.VerifyAddress to verify an Australian address against Postal Address File. For more information on this method see
A Request Key (RK) is assigned and provided after you successfully register your Kleber account. Every client has a unique Request Key and it should be protected when making a call to Kleber server. In order to protect your RK, you can generate a Temporary Request Key that can be used to test all Kleber methods.
The DataTools.Security.GenerateTemporaryRequestKey method will create an encrypted key that can last anywhere from 3 seconds up to 5 minutes based on your application needs. It helps prevent anyone from using your Kleber credit as it becomes unusable once it expires.
Note: Please keep in mind that it is important to protect your Request Key to prevent your account credentials being used without your permission.
Step 4
The RepairAddress function can be called in multiple location. The function gets called if the verify fails.
Copy and paste this code after the code from Step 3.
function RepairAddress()
  {
            $.ajax({
                    url: "https://Kleber.datatoolscloud.net.au/KleberWebService/DtKleberService.svc/ProcessQueryStringRequest",
                    dataType: "jsonp",
                    type: "GET",
                    contentType: "application/json; charset=utf-8",
                    data: {
                    				OutputFormat:"json", Method:"DataTools.Repair.Address.AuPaf.RepairAddress", AddressLine1: $('#addline1').val(),
                            Locality: $('#suburb').val(), State: $('#state').val(), Postcode: $('#postcode').val(),
                            RequestKey:""
                          },
                    success: function( data )
                    {
                        $.map(data.DtResponse.Result, function (item)
                        {
                          if(item.DPID != "")
                          {
                            $('#addline1').val(item.AddressLine);
                            $('#suburb').val(item.Locality);
                            $('#state').val(item.State);
                            $('#postcode').val(item.Postcode);
                            $('#dpid').val(item.DPID);
                          }
                        });
                    }
                });
  };
The example above uses the Kleber method DataTools.Repair.Address.AuPaf.RepairAddress to repair an Australian address. For more information on this method see: DataTools Kleber Method Description
Step by step instructions for Australian Address Capture
Predictive Australian Address Capture Showcase
This document has been written for developers who want to implement Kleber Predictive Australian Showcase on their websites. To make the showcase easier to test and implement, this document provides code samples with each step of implementation that can be copied and pasted into websites.
Showcase URL – http://discover.datatools.com.au/showcases/predictive-australian-address-capture/
Search Method – DataTools.Capture.Address.Predictive.AuPaf.SearchAddress – As the user types an address, this method lists all possible addresses for selection.
Please Note: Special conditions apply to the use of this method. This method must always be used in conjunction with the retrieve method DataTools.Capture.Address.Predictive.AuPaf.RetrieveAddress. If the retrieve method is not called, or not utilised with an appropriate retrieve ratio to searches, an auto retrieve cost will be applied to your account to ensure you do not breach the data licencing conditions.
Retrieve Method – DataTools.Capture.Address.Predictive.AuPaf.RetrieveAddress – This method is called once a user has selected an address from the drop down list
[HTMLGrab localfolder=”iFrames” src=”ButtonScripts.htm”]
If you want to test the predictive showcase in real time you can use JS Fiddle. JS Fiddle is a helpful tool for developers to manage codes easily when testing codes. JS fiddle layouts web development programming language such as HTML, CSS and JavaScript in a three separate panels, making it simple for developers to work on all codes at once. In JS Fiddle, developers can collaborate and share codes.
Click the JS fiddle button to start testing predictive showcase using JS Fiddle tool
The steps below will show how we can add predictive address search to the address line field.
Step-by-step how to code JQuery with Kleber
Below is a very basic address form that we will use for this step-by-step.
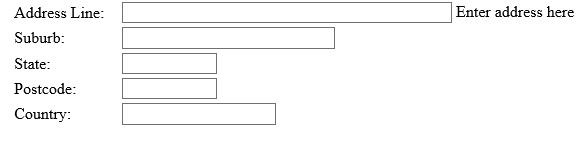
Fig-1: Auto-complete form template
Before testing the showcase, an address form is necessary in testing to capture the address. The code below is an example of a basic HTML address form that would help you start testing the Predictive Showcase. You can use it as a base or reference to create your own address form.
Create a new AddressForm.html file and insert the code below.
  <html>
  <head></head>
  <body>
  <div style="color: rgb(0, 0, 0); font-family: 'Times New Roman'; font-size: medium; font-style: normal; font-variant: normal; font-weight: normal;
  letter-spacing: normal; line-height: normal; orphans: auto; text-align: start; text-indent: 0px; text-transform: none; white-space: normal; widows: 1;
  word-spacing: 0px; -webkit-text-stroke-width: 0px; padding-left: 409.25px; background-color: rgb(255, 255, 255);">
	  <form>
	    <table>
		  <tr>
			  <td>Address Line:</td>
			  <td style="width: 10px;"></td>
		      <td>
			  <input name="Address line 1" id="addline1" type="text" size="50" />
			   Enter address here</td>
			  </tr>
			  <tr>
				  <td>Suburb:</td>
				  <td style="width: 10px;"></td>
				  <td><input name="Suburb" id="suburb" type="text" size="30" /></td>
			  </tr>
			  <tr>
				  <td>State:</td>
				  <td style="width: 10px;"></td>
				  <td><input name="State" id="state" type="text" size="10" /></td>
			  </tr>
			  <tr>
				  <td>Postcode:</td>
				  <td style="width: 10px;"></td>
				  <td>
				  <input name="Postcode" id="postcode" type="text" size="10" /></td>
			  </tr>
			  <tr>
				  <td>Country:</td>
				  <td style="width: 10px;"></td>
				  <td><input name="Country" id="country" type="text" size="20" /></td>
			  </tr>
		  </table>
	  </form>
   </div>
   </body>
   </html>
Note
- If you are testing the Predictive Showcase using JS Fiddle tool, you do not have to copy and paste the code of HTML address form. The codes are already pasted on panels by default.
- On the code provided above, the ‘ID’ value for the address line field is “addline1”.
<input name=”Address line 1” id=”addline1“ type=”text” size=”50” />
- If you want to use your own address form please keep in mind that the ‘ID’ value will be different.
Step 1
You should have an address form ready for testing. It is either the form we provided or your own address form. The steps below will show you how we can add predictive address searching to the address line field.
Please paste the following code into your application. The code below adds the required JQuery libraries for the autocomplete Ajax call. The CSS section adds a ‘processing’ gif so that there is a visual indication that the code is waiting for a reply from the server. Paste the following code into the <head> section of your page.
<link href="http://kleber.datatoolscloud.net.au/jquery19/themes/base/jquery.ui.all.css" rel="stylesheet">
	<script src="http://kleber.datatoolscloud.net.au/jquery19/jquery-1.9.1.js" ></script>
	<script src="http://kleber.datatoolscloud.net.au/jquery19/ui/jquery.ui.core.js" ></script>
	<script src="http://kleber.datatoolscloud.net.au/jquery19/ui/jquery.ui.widget.js" ></script>
	<script src="http://kleber.datatoolscloud.net.au/jquery19/ui/jquery.ui.position.js" ></script>
	<script src="http://kleber.datatoolscloud.net.au/jquery19/ui/jquery.ui.autocomplete.js" ></script>
	<Script src="http://kleber.datatoolscloud.net.au/jquery19/ui/jquery.ui.menu.js" ></script>
	<style type="text/css">

	.ui-autocomplete-loading
{
background: white URL('http://kleber.datatoolscloud.net.au/dt_processing_images/dt20x20.gif') right center no-repeat;
 }
	</style>
Step 2
Below is the first section of the JQuery autocomplete code. Paste the following code after the </style> tag from Step 1.
<script>
	$(function()

{

$('#addline1').autocomplete(
		{
			source: function( request, response )
			{
As you can see in the script above, the field used for the predictive search is the ‘addline1’ field. If you are using your own address form, replace ‘addline1’ to match your own field name.
There are a number of settings that can be set for the Ajax call however we have found the below settings work best.
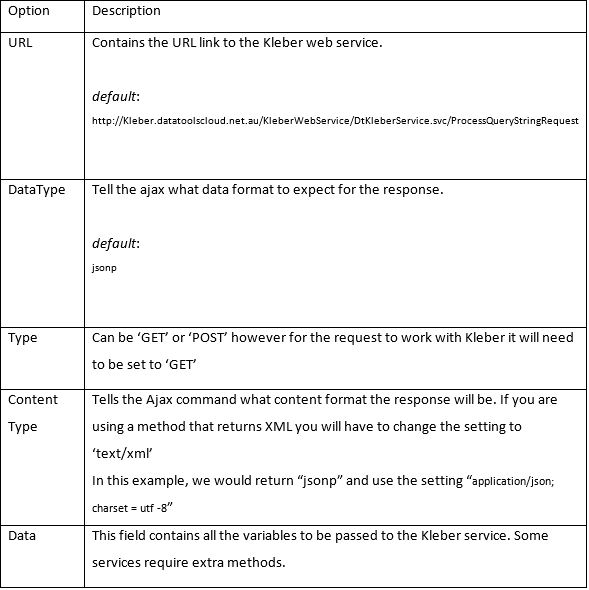
The URL parameter holds the web URL for the KLEBER web service. If it does not contain the correct URL, the Ajax call will not receive the required response.
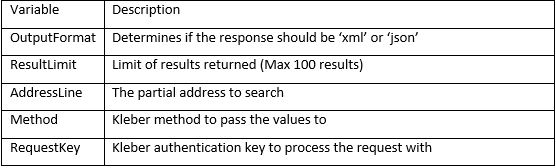
Below is where the Ajax call is performed to return the predictive dropdown list.
Please see code below for an example. Copy and paste this code to your application after the sample from Step 2.
		$.ajax(
				{

				url: "http://Kleber.datatoolscloud.net.au/KleberWebService/DtKleberService.svc/ProcessQueryStringRequest",
					dataType: "jsonp",
					type: "GET",
					contentType: "application/json; charset=utf-8",
					data: {OutputFormat:"json", ResultLimit:100, AddressLine:request.term, Method:"DataTools.Capture.Address.Predictive.AuPaf.SearchAddress", RequestKey:" "},
					success: function( data )
					{
						$('#dpid').val("");
						response( $.map( data.DtResponse.Result, function( item )
						{

							var Output = (item.AddressLine + ", " + item.Locality + ", " + item.State + ", " + item.Postcode);
							return {label: Output,value: Output,Output: Output,	RecordId: item.RecordId,AddressLine: item.AddressLine};
						}));
					}
				});
			},
The example above uses the Kleber method DataTools.Capture.Address.Predictive.AuPaf.SearchAddress to return address suggestions for each keystroke into the address line field. For more information on this method see http://kleber.datatoolscloud.net.au/kleberbrowser/KleberMethodDescription.aspx?Method=DataTools.Capture.Address.Predictive.AuPaf.SearchAddress
A Request Key (RK) is assigned and provided after you successfully register your Kleber account. Every client has a unique Request Key and it should be protected when making a call to Kleber server. In order to protect your RK, you can generate a Temporary Request Key that can be used to test all Kleber methods.
The DataTools.Security.GenerateTemporaryRequestKey method will create an encrypted key that can last anywhere from 3 seconds up to 5 minutes based on your application needs. It helps prevent anyone from using your Kleber credit as it becomes unusable once it expires.
For more information about generate temporary keys, please click on this link: http://kleber.datatoolscloud.net.au/kleberbrowser/KleberMethodDescription.aspx?Method=DataTools.Security.GenerateTemporaryRequestKey
Note: Please keep in mind that it is important to protect your Request Key to prevent your account credentials being used without your permission.
Step 3
At this point, the code you have copied should be enough for you to type in an address. As the user types, a drop down list of possible addresses should appear.
The Retrieve method allows you to retrieve the parsed fields from an individual address that was selected from the first ajax call. The additional address information returned includes the DPID, Unit Type, Street Number, PostBox Number, Building Name and etc.
Please note that we use a different method in the sample below which is: DataTools.Capture.Address.Predictive.AuPaf.RetrieveAddress
For more information on this method see http://kleber.datatoolscloud.net.au/kleberbrowser/KleberMethodDescription.aspx?Method= DataTools.Capture.Address.Predictive.AuPaf.RetrieveAddress
Copy and paste the code to your application.
select: function( event, ui )
			   {
					 $.ajax(
				     {
							url: "http://Kleber.datatoolscloud.net.au/KleberWebService/DtKleberService.svc/ProcessQueryStringRequest",
							dataType: "jsonp",
							crossDomain: true,
							data: {
									OutputFormat:"json",
									RecordId:ui.item.RecordId,
									Method:"DataTools.Capture.Address.Predictive.AuPaf.RetrieveAddress",
									RequestKey:" "},
							success: function (data)
							{
								$.map(data.DtResponse.Result, function (item)
								{
									$('#addline1').val(ui.item.AddressLine);
									$('#suburb').val(item.Locality);
									$('#state').val(item.State);
									$('#postcode').val(item.Postcode);
									$('#dpid').val(item.DPID);
									displayMapAddress(ui.item.AddressLine + ", " + item.Locality + " " + item.State + " " + item.Postcode);
								});
							}
					});
			  },
		});
	});
Please Note: Special conditions apply to the use of the DataTools.Capture.Address.Predictive.AuPaf.SearchAddress method. This method must always be followed by either the DataTools.Capture.Address.Predictive.AuPaf.RetreiveAddress method once an address has been selected. Failing to do so will be a breach to the data licencing conditions and penalties will apply.
Need to access Kleber with Java Script JQuery?
Step 1 – Go to the Kleber Browser
Step 2 – Select which method you need to develop, to view the technical documentation.
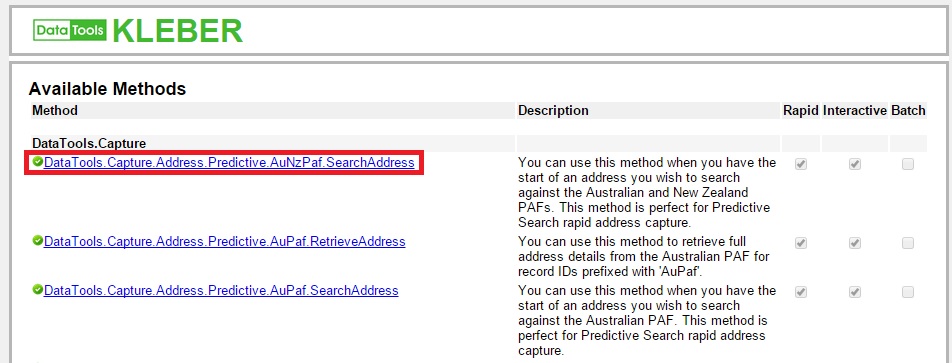
Step 3 – The page has all the technical information that you require to implement the method. The benefits of this page to you the developer, is that it provides both the Request, Response and Endpoint parameters.
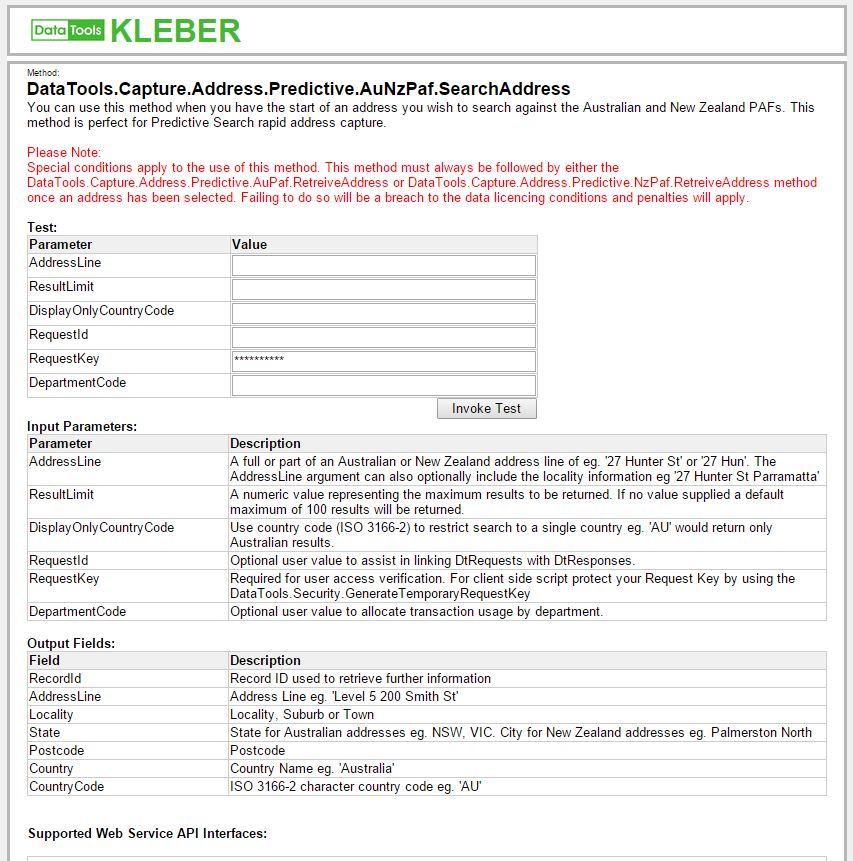
To view a sample of JQuery code for the particular method you have chosen, scroll down to the middle of the page where you will find a button labelled “JQuery”.
![]()
This button will open a page displaying the formatted ‘JQuery Code Sample’ for your selected method.
Step 4 – Example of the code.
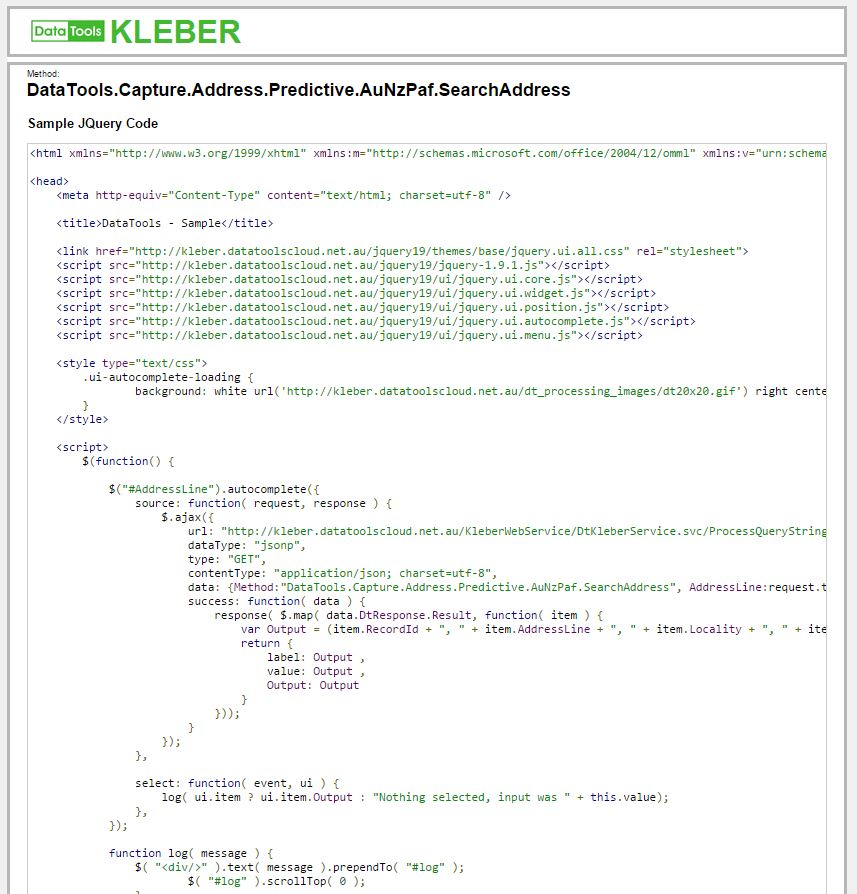
Note: Please refer to your contact to obtain a Kleber Request Key, required for testing.
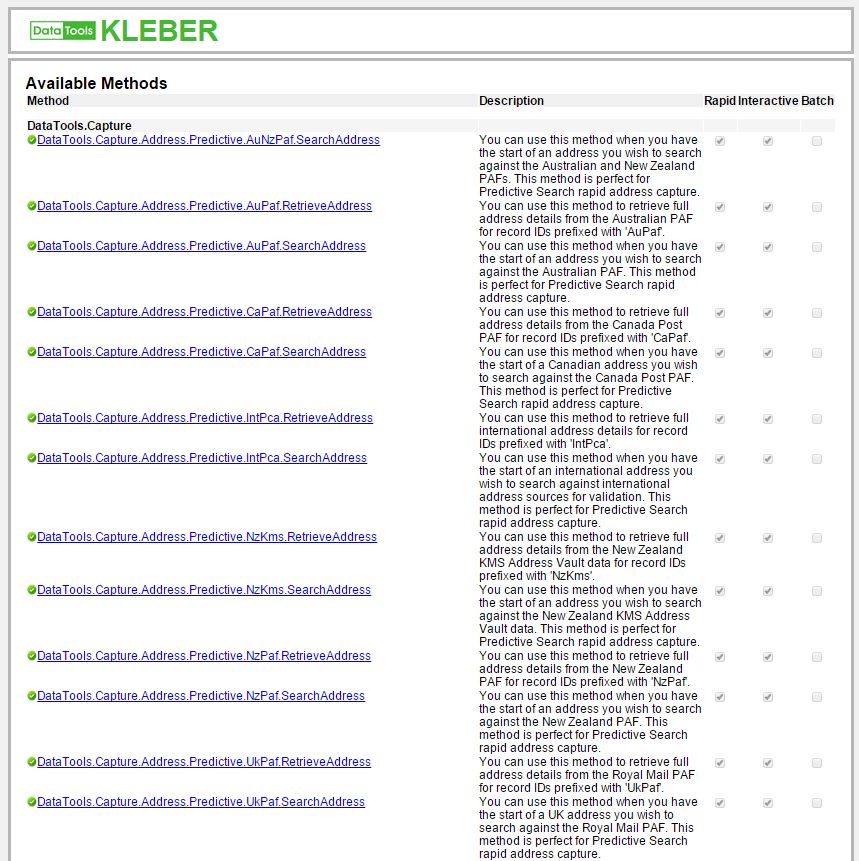
Need to access Kleber Ruby methods?
Step 1 – Go to the Kleber Browser
Step 2 – Select which method you need to develop, to view the technical documentation.
Step 3 – The page has all the technical information that you require to implement the method. The benefits of this page to you the developer, is that it provides both the Request, Response and Endpoint parameters.
To view a sample of Ruby code for the particular method you have chosen, scroll down to the bottom of the page where you will find a button labelled “Ruby”.
![]()
This button will open a page displaying the formatted ‘Ruby Code Sample’ for your selected method.
Step 4 – Example of the code.

Note: Please refer to your contact to obtain a Kleber Request Key, required for testing.
Need to access Kleber with PHP?
Step 1 – Go to the Kleber Browser
Step 2 – Select which method you need to develop, to view the technical documentation.
Step 3 – The page has all the technical information that you require to implement the method. The benefits of this page to you the developer, is that it provides both the Request, Response and Endpoint parameters.
To view a sample of PHP code for the particular method you have chosen, scroll down to the bottom of the page where you will find a button labelled “PHP”.
![]()
This button will open a page displaying the formatted ‘PHP Code Sample’ for your selected method.
Step 4 – Example of the code.

Note: Please refer to your contact to obtain a Kleber Request Key, required for testing.
Need to access Kleber with Java?
Step 1 – Go to the Kleber Browser.
Step 2 – Select which method you need to develop, to view the technical documentation.
Step 3 – The page has all the technical information that you require to implement the method. The benefits of this page to you the developer, is that it provides both the Request, Response and Endpoint parameters.
To view a sample of Java code for the particular method you have chosen, scroll down to the bottom of the page where you will find a button labelled “Java”.
![]()
This button will open a page displaying the formatted ‘Jave Code Sample’ for your selected method.
Step 4 – Example of the code.
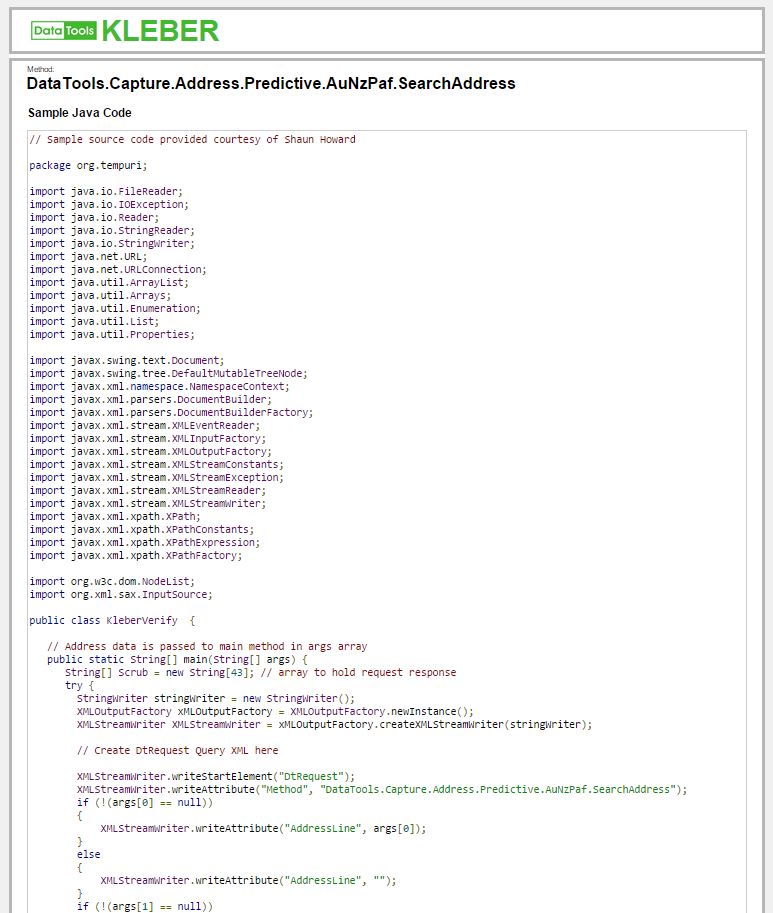
Note: Please refer to your contact to obtain a Kleber Request Key, required for testing.
Need to access Kleber with VB.Net?
Step 1 – Go to the Kleber Browser
Step 2 – Select which method you need to develop, to view the technical documentation.
Step 3 – The page has all the technical information that you require to implement the method. The benefits of this page to you the developer, is that it provides both the Request, Response and Endpoint parameters.
To view a sample of VB.Net code for the particular method you have chosen, scroll down to the bottom of the page where you will find a button labelled “VB.Net”.
![]()
This button will open a page displaying the formatted ‘VB.Net Code Sample’ for your selected method.
Step 4 – Example of the code.
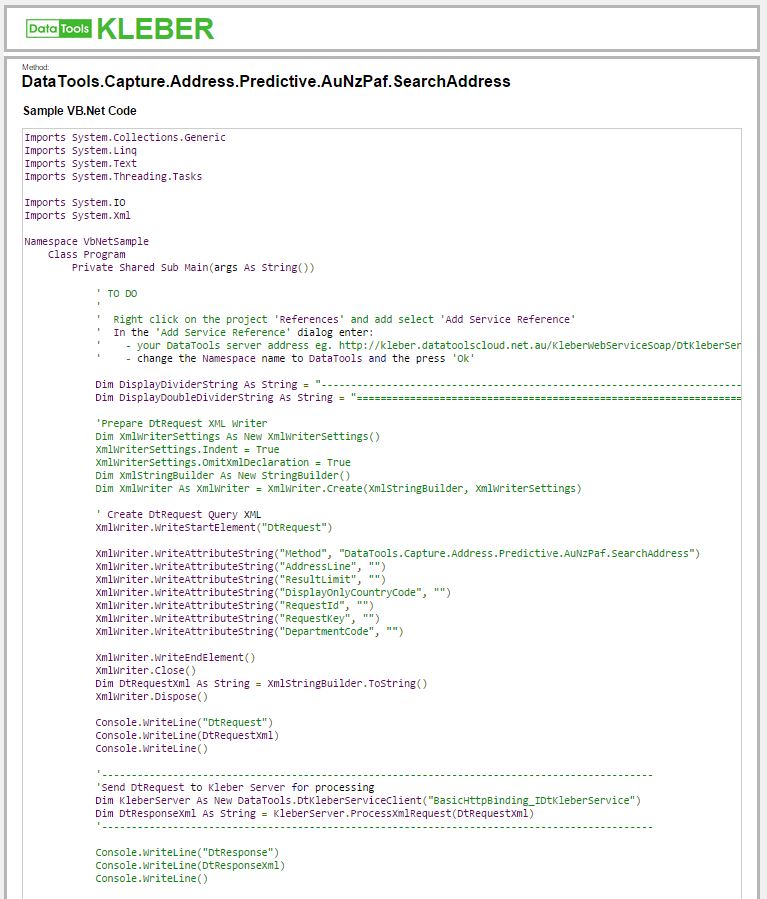
Note: Please refer to your contact to obtain a Kleber Request Key, required for testing.
Need to access Kleber with C#?
Step 1 – Go to the Kleber Browser
Step 2 – Select which method you need to develop, to view the technical documentation.
Step 3 – The page has all the technical information that you require to implement the method. The benefits of this page to you the developer, is that it provides both the Request, Response and Endpoint parameters.
To view a sample of C# code for the particular method you have chosen, scroll down to the bottom of the page where you will find a button labelled “C# ”.
![]()
This button will open a page displaying the formatted ‘C# Code Sample’ for your selected method.
Step 4 – Example of the code.
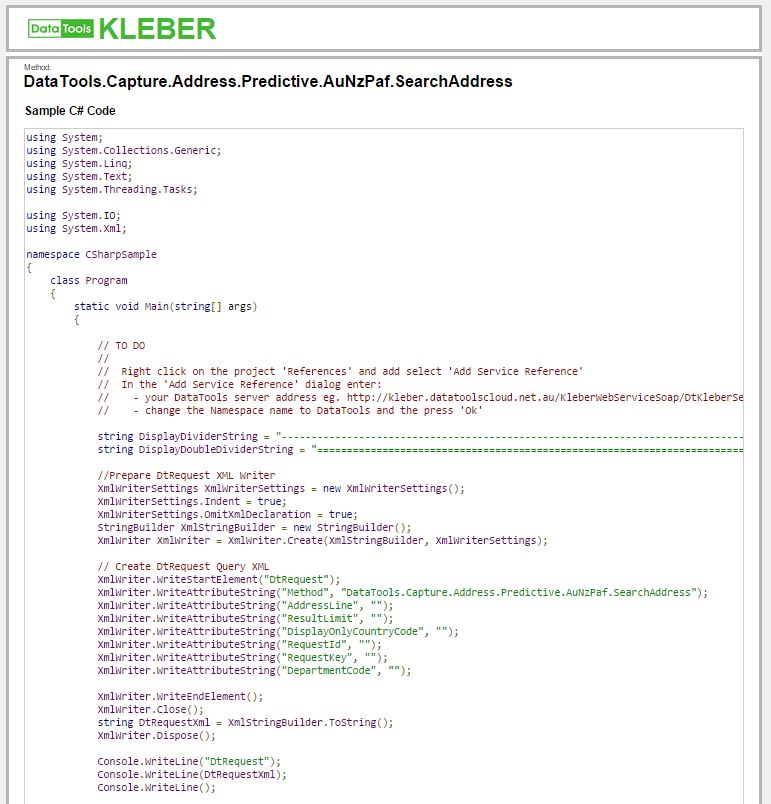
Note: Please refer to your contact to obtain a Kleber Request Key, required for testing.
The following code implements the DataTools Kleber predictive address capture service on the Contact form in Dynamics CRM.
Step 1
Download the Sample Files “index.html”, “new_jquery_autocomplete_all.js”, “new_jquery1.9.1” and “new_autocomplete_style.css” below.
Step 2
Upload the “new_jquery_autocomplete_all.js”, “new_jquery1.9.1” and “new_autocomplete_style.css” as “web resource” into Dynamics CRM.
Step 3
Open the “index.html” file in an editor and update the following:
a. Update the paths in the “link href” on line 4 and the “script src” on lines 5 and 6 to the new web resource path where the resources were uploaded to in Dynamics CRM.

b. On line 10, update the Request Key to your Request Key obtained from your Kleber Accounts page.

c. If you have been allocated a custom web service end points for Kleber edit the URL on lines 28 and 50 otherwise leave them as they are.


d. Note: Please rename the field names in the example “index.html” to match your Dynamics CRM field names in lines no. 15, 59, 61,62,63 & 64.

Step 4
After you have made the modification to the “index.html” file upload it as a “HTML web resource” into Dynamics CRM.
Step 5
Now you need to add this as a web resource in your required form. You can simply do this by going in to form editing page and insert a web resource.

Step 6
Fill the details and remember that you must not check the restriction checkbox highlighted below:

Step 7
After this, you just need to adjust the properties to display the iframe (web resource) you just created and it will work fine in the page you embedded this web resource.